That brownish ring on your ceiling or the bubbling paint behind the bathroom sink is more than just an eyesore—it’s a warning sign. Water has a way of traveling, and the visible damage is often just the tip of the iceberg. Behind that wall, moisture could be silently weakening the structure of your home and creating the perfect breeding ground for mold, which can pose a serious health risk. Tackling the problem correctly is crucial. This isn’t just about patching a hole; it’s about ensuring your home is safe and dry. We’ll guide you through the essential steps to properly repair drywall water damage, from finding the source of the leak to applying the final coat of paint, so you can fix the problem for good.
Key Takeaways
- Address the Source Before the Symptom: Before any repairs, you must find and fix the water source. Any patch is just a temporary fix if the leak continues, so ensure the area is completely dry before you pick up a tool.
- The Damage Dictates the Repair: Gently press on the affected spot. If the drywall is firm despite staining, a surface repair will likely work. If it’s soft, spongy, or crumbling, the entire section needs to be cut out and replaced to prevent future issues.
- Recognize When to Call a Professional: Don’t hesitate to call for help with major issues. Contaminated water, signs of structural problems like a sagging ceiling, or widespread mold all require professional equipment and expertise for a safe and effective solution.
What Causes Water Damage in Drywall?
Water damage can sneak up on you, often starting from a hidden source before making a grand, unwelcome entrance. Understanding where the water is coming from is the first step toward a real solution. From sudden pipe bursts to the slow, steady drip of a leaky roof, the causes are varied, but they all demand quick attention to protect your property. Before you can even think about repairs, you have to play detective and pinpoint the source. Here are some of the most common culprits behind water-damaged drywall in Florida homes and businesses.
Leaks, Bursts, and Backups
Some of the most frequent causes of water damage are hiding right inside your walls and floors. A slow leak from a worn-out pipe, a sudden burst pipe, or an overflowing appliance can saturate drywall quickly. The most important rule is to find and fix the source of the water before starting any repairs. If you don’t, you’ll just be patching a problem that’s guaranteed to return. Be especially cautious if the water came from a sewer backup, as this contaminated water poses a serious health risk. In that situation, it’s always best to call in professionals to handle the cleanup safely.
Storms and Roof Damage
Living in Florida, we’re no strangers to heavy rain and strong winds. Storms can damage roofing materials, loosen flashing, or clog gutters, creating pathways for water to seep into your attic and ceilings. You might notice coffee-colored stains that grow over time, dripping water, or even sagging spots on your ceiling. If you see any of these signs, especially after a storm, act fast. A waterlogged ceiling is incredibly heavy and can be a collapse hazard. Getting a professional to assess the situation is the safest way to handle potential water damage restoration from a compromised roof.
Flooding Events
Whether from a major storm surge or a malfunctioning appliance that floods a room, significant flooding can cause extensive damage to drywall. Depending on how high the water rose, you might need to replace entire sections of your wall. As a general rule, any drywall that was submerged needs to be cut out and replaced to prevent mold growth and structural issues. For severe flooding, this can mean removing drywall up to four feet or higher. Handling this level of complete restoration is a big job that often requires professional equipment and expertise to ensure your home is dried out properly.
HVAC System Failures
Your air conditioning system works hard to keep you cool, but it can also be a source of water damage. Clogged drain lines or a malfunctioning condensate pump can cause water to overflow, seeping into the surrounding walls and ceilings. Because these leaks are often slow and hidden, they can go unnoticed until significant damage and mold have already developed. The longer water sits, the more it weakens your drywall and creates a perfect environment for mold. If you suspect an HVAC leak, it’s crucial to address the emergency water damage immediately to minimize the long-term impact on your home.
How to Assess Water Damage in Your Drywall
Once you’ve located the source of the water, the next step is to figure out how much damage you’re dealing with. A thorough assessment will help you decide whether you can handle the repair yourself or if it’s time to call in the pros. Water can compromise the structural integrity of drywall and create the perfect environment for mold, so you want to be sure you know the full extent of the problem before you start patching things up.
To get a clear picture, you’ll need to check a few key things. Start with a visual inspection, looking for obvious signs like discoloration and sagging. From there, you’ll need to physically test the drywall to see if it’s still solid or has turned soft and crumbly. Don’t forget to use your nose—a musty smell is a tell-tale sign of hidden moisture or mold growth. Finally, you need to confirm that the area is completely dry, not just on the surface but all the way through to the wooden studs behind it. Taking the time to do this right will save you from bigger headaches down the road.
Look for These Visual Signs
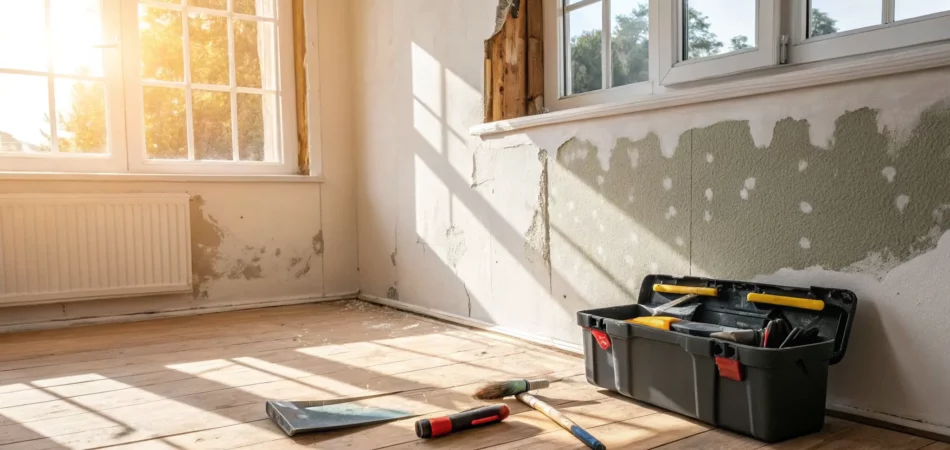
Your eyes are your first and best tool for spotting trouble. Water damage often leaves behind obvious clues. Look for distinct, coffee-colored stains on walls or ceilings, which can grow over time if you have a slow, persistent leak. You might also see wet spots, active drips, or areas where the paint or wallpaper is bubbling and peeling away from the surface. In more severe cases, the drywall itself may start to sag or bulge under the weight of the absorbed water. These visual cues are your signal to investigate further, as they often point to a bigger issue hiding behind the wall.
Test the Drywall’s Integrity
Looks can be deceiving, so the next step is a physical check. Gently press on the affected area with your fingers. Healthy drywall is firm and solid. If the area feels soft, spongy, or mushy, the internal structure of the gypsum core has been compromised. You can also use a screwdriver to carefully poke the spot; if it sinks in easily or the drywall crumbles, it’s a clear sign that the material is too damaged to be saved. For minor surface issues on solid drywall, a simple repair might work. But if you’re dealing with crumbling, water damage restoration will require cutting out and replacing the entire section.
Identify Signs of Mold and Mildew
Where there’s moisture, there’s often mold. As you inspect the drywall, look for fuzzy or slimy patches that can be black, green, or even white. You should also trust your nose—a persistent musty or earthy smell is a classic indicator of mold growth, even if you can’t see it. If you find a small patch of mold (less than 10 square feet), you may be able to handle it yourself. However, for larger infestations, it’s crucial to call a professional. Certain types of mold can be hazardous to your health, and proper environmental cleanup ensures it’s removed safely and completely.
Measure the Moisture Levels
Just because drywall feels dry to the touch doesn’t mean it’s ready for repair. Moisture can linger deep within the material and in the wooden studs behind it, creating a hidden risk for future mold growth and rot. Professionals use moisture meters to get an exact reading, but you can take steps to ensure thorough drying. After removing any unsalvageable drywall, use high-powered fans and a dehumidifier to circulate air and pull moisture from the exposed wall cavity. Let them run for at least 48 hours to ensure the underlying structure is completely dry before you even think about installing a new patch.
Found Water Damage? Here’s What to Do Now
Discovering water damage can feel overwhelming, but taking immediate, calculated steps can make a huge difference in the outcome. Acting quickly helps minimize the damage to your property and sets you up for a smoother restoration process. Before you even think about repairs, your first priority is to control the situation. This means stopping the water, clearing the area, and beginning the drying process. It’s also crucial to document everything for your insurance claim. Think of these next few actions as your emergency first-aid plan for your home. By following this guide, you can protect your property from further harm and get on the right path to getting things back to normal. Remember, for anything more than a small, manageable leak, professional help is your best bet to ensure the job is done right and to prevent long-term issues like mold.
Stop the Source of the Water
Before you can even begin to clean up, you have to stop more water from coming in. This is the most critical first step. If you skip it, any cleanup or repair work you do will be undone. The source might be obvious, like an overflowing toilet, or it could be hidden, like a slow leak inside a wall. If you’re dealing with a plumbing issue, like a burst pipe, find your home’s main water shut-off valve and turn it off immediately. If the water is coming from a specific appliance, like a dishwasher or washing machine, you can usually find a local shut-off valve behind or near it. For roof leaks or flooding, the situation is more complex, but the principle is the same: do what you can to prevent more water from entering the affected area.
Clear the Area and Remove Standing Water
Once the source of the water is under control, your next job is to get everything out of the way. Move furniture, rugs, electronics, and any other personal belongings to a dry, safe location. The faster you can remove items from the wet area, the better your chances of salvaging them. After the room is clear, focus on removing any standing water. For small amounts, you can use mops, old towels, and buckets. For more significant flooding, a wet/dry vacuum is a powerful tool. Removing the bulk of the water quickly is essential to prevent it from seeping deeper into your floors, subfloors, and wall cavities. This is a crucial step in preventing secondary damage and the start of mold growth, which can begin in as little as 24 hours.
Start the Drying Process
After you’ve removed all the standing water, the real drying begins. The goal is to dry out the structure itself—the drywall, studs, and flooring. For this, you need to create as much airflow as possible. Open up windows and doors to let in the fresh air, and set up fans to keep the air circulating throughout the space. If you have dehumidifiers, now is the time to put them to work. They are excellent at pulling moisture out of the air, which speeds up the drying of materials. Keep the fans and dehumidifiers running continuously for at least 48 hours, or until the area feels completely dry to the touch. For serious situations, professional water damage restoration services use industrial-grade equipment that is far more effective than household fans.
Document Everything for Insurance
Before you move anything or begin any major cleanup, grab your phone and start taking pictures and videos. Document the damage from every angle. Get wide shots of the entire affected area and close-ups of damaged items, soaked drywall, and the source of the water if you found it. This visual evidence is incredibly important for your homeowner’s insurance claim. Keep a running list of all the items that were damaged, and if possible, find receipts for more expensive belongings. Don’t throw anything away until your insurance adjuster has had a chance to see it. Detailed documentation makes the claims process much smoother and helps ensure you get the compensation you’re entitled to. If you need help, our team can guide you through the process when you contact us.
Gathering Your Tools and Materials for Drywall Repair
Before you start any repair, it’s smart to gather everything you’ll need. Having your tools and materials ready makes the process smoother and helps you get the job done right the first time. The supplies you’ll need depend on whether you’re tackling a small patch or replacing a whole section of the wall. Think of it like cooking—you wouldn’t start a recipe without having all your ingredients on the counter. This prep work saves you from making extra trips to the hardware store and keeps your project on track. Let’s break down what you’ll need for both minor and major repairs.
Tools for Minor Repairs
For small issues like bubbling paint or a slightly soft spot, you won’t need a huge arsenal of tools. The main goal is to remove the damaged material and create a smooth surface for the new finish. Start with a putty knife or a scraper to gently peel away any loose paint and soggy drywall paper. This gives you a clean, solid base to work from. You’ll also want a utility knife for cutting clean edges, some fine-grit sandpaper for smoothing, joint compound for filling, and of course, primer and paint that match your wall. These basic tools are often enough to handle the early stages of water damage restoration.
Supplies for Major Repairs
When you’re dealing with a large, saturated area or a hole, a simple patch job won’t cut it. You’ll need to replace the damaged section entirely. For this, you’ll need a new piece of drywall cut to size. It’s often easiest to cut the damaged section out from stud to stud to create a stable area for the new piece. You’ll also need drywall screws and a drill to secure the patch, along with drywall tape and joint compound to blend the seams. Using drywall clips can also help support the edges of the new patch if you can’t land on a stud. This kind of work is a key part of any complete restoration project.
Essential Safety Gear
Please don’t skip this step—your safety is the top priority. Always wear gloves to protect your hands, safety goggles to shield your eyes from dust and debris, and a dust mask. A mask is especially important because drywall dust can irritate your lungs, and if you’re dealing with mold, you definitely don’t want to breathe in any spores. If your home was built before the 1980s, be extra cautious, as the drywall could contain asbestos. Protecting yourself with the right gear is non-negotiable and a critical part of any project, especially one that might involve environmental cleanup of hazardous materials.
How to Repair Minor Drywall Water Damage
If you’ve caught a water issue early, you might be looking at a discolored spot or some bubbling paint on your drywall. For this kind of minor damage, a DIY repair is often manageable if you have the right tools and a bit of patience. The key is to work methodically and ensure the wall is completely dry before you start patching things up. This guide will walk you through the process step-by-step.
Remember, this advice is for cosmetic, surface-level damage. If the drywall feels soft and spongy, is sagging, or the affected area is larger than a dinner plate, it’s best to call in the pros. Extensive moisture can lead to hidden mold and structural problems that require professional water damage restoration to handle safely and effectively. But for a small, contained issue, you can get your wall looking good as new on your own.
Step 1: Dry and Prep the Area
Before you even think about patching the wall, you have to address the root of the problem. As restoration experts always say, “Always find and fix the source of the water before you start any repairs.” Whether it’s a dripping pipe, a leaky window, or a small roof issue, that leak must be stopped completely. If you’re not sure where the water is coming from, a professional leak detection service can pinpoint the source without tearing up your walls. Once the leak is fixed, your next job is to get the drywall bone-dry. Aim fans at the damp spot and use a dehumidifier to pull moisture from the air and the wall itself. This can take a few days, but it’s a non-negotiable step.
Step 2: Remove Damaged Paint and Debris
Once the area is completely dry, it’s time to clear away the damage. Grab a putty knife or a paint scraper and gently begin to scrape off any loose, bubbling, or peeling paint. You want to remove anything that is no longer securely attached to the wall. If you see any drywall paper tape that has come loose or is peeling away at the seams, carefully pull that off as well. The goal here is to create a clean, solid foundation for your repair. Work from the outside edges of the damaged area inward, being careful not to gouge the surrounding, intact drywall. Brush away any dust or debris when you’re finished.
Step 3: Apply Joint Compound and Tape
With the damaged material gone, you can start rebuilding the surface. Use a putty knife to apply a thin, even layer of joint compound (often called “mud”) over the entire area, filling any shallow gouges or imperfections. If you removed any tape from a seam, you’ll need to re-tape it. Press a new piece of drywall tape firmly into the fresh mud, and then use your putty knife to apply another thin layer of compound over the tape, smoothing it out from the center. This process, known as “feathering,” helps blend the repaired area seamlessly with the rest of the wall.
Step 4: Sand, Prime, and Paint
Patience is key during this final stage. “Let each layer of joint compound dry completely before adding more or sanding.” Depending on the depth of the repair, you may need to apply a second or even a third thin coat of mud to get a perfectly smooth surface, sanding lightly with fine-grit sandpaper between each coat. Once your final coat is dry and you’ve sanded it smooth, wipe away all the dust with a damp cloth. Next, apply a coat of stain-blocking primer. This is crucial for preventing the old water stain from bleeding through your new paint. After the primer dries, you can finally paint the patch to match the rest of your wall, completing your complete restoration project.
How to Tackle Major Drywall Water Damage
When water damage is extensive—think large, sagging areas or crumbling drywall—a simple patch job just won’t cut it. This level of damage requires removing the affected section entirely and replacing it with a new piece of drywall. It’s a bigger project, for sure, but completely manageable with the right approach and a little patience. The goal is to create a repair so seamless that you’ll forget the damage was ever there in the first place. This process involves careful cutting, precise fitting, and smooth finishing, so it’s important to take your time with each step to get it right.
Of course, some jobs are too big for a DIY approach. If the damage is widespread, affects multiple rooms, or you’re concerned about hidden moisture and potential mold growth behind the walls, it’s always best to get a professional assessment. A team of experts can handle the entire process, from demolition to the final coat of paint, ensuring the repair is done correctly and no underlying issues are missed. For a comprehensive fix that addresses both the visible and hidden damage, professional water damage restoration is the safest way to protect your home’s structural integrity.
Step 1: Safely Cut Out the Damaged Section
First, you need to remove all the compromised material. If the drywall is soft, crumbling, or shows significant staining, it has to go. Replacing the damaged section is the best course of action to prevent future problems like mold. Use a utility knife to score a clean rectangle around the damaged area, then use a drywall saw to carefully cut it out. It’s often easiest to cut from one wall stud to the next, which will give you a solid frame to attach the new piece. Once the section is removed, take a moment to inspect the wall cavity for any lingering dampness or mold before moving on.
Step 2: Install the New Drywall Patch
With the damaged section gone, it’s time to fit the replacement. Measure the opening you created and cut a new piece of drywall to the exact same dimensions. For the best results, cut the entire damaged section out to the nearest wall studs. This makes it much easier to attach the new piece securely and ensures a sturdier, more stable repair. A snug fit is key here, so remember the old rule: measure twice, cut once. The new patch should sit flush with the existing drywall, creating a smooth, even surface to work with for the finishing steps.
Step 3: Secure the Patch
Now, place your perfectly cut drywall patch into the opening. Position it against the wall studs and secure it with drywall screws. Using a drill, drive the screws about every 6 to 8 inches along the studs. Be careful not to overdrive them—you want the screw heads to sink just slightly below the paper surface of the drywall without tearing it. This small indentation, or “dimple,” will be filled with joint compound later, creating a perfectly flat finish. A securely fastened patch is the foundation of a durable, long-lasting repair that won’t crack or shift over time.
Step 4: Tape, Mud, and Finish
This is where the artistry comes in. After securing the patch, apply drywall tape over the seams to bridge the gap between the old and new drywall. Next, use a putty knife to apply a thin layer of joint compound (or “mud”) over the tape and screw heads. Allow each layer of joint compound to dry thoroughly before applying the next. You’ll likely need two to three coats, sanding lightly with fine-grit sandpaper between each one. The goal is to feather the edges of the compound so it blends invisibly with the surrounding wall. Once it’s completely smooth and dry, your wall is ready for primer and paint, finishing the complete restoration of your space.
Safety First: Precautions for Your Repair Project
Before you pick up a single tool, let’s talk about safety. Tackling a drywall repair project yourself can be rewarding, but water damage often comes with hidden risks that can affect your health and your home’s integrity. From electrical hazards lurking behind wet walls to unseen mold spores in the air, taking the right precautions is not just a good idea—it’s essential. Think of this as your pre-project safety checklist. Following these steps will help protect you from injury and ensure your repair work is sound and lasting.
If you ever feel overwhelmed or unsure about any of these safety measures, it’s always best to pause and call in a professional. Handling water damage restoration correctly is more important than doing it quickly, and your safety is the top priority. These guidelines will help you proceed with confidence, knowing you’re taking the necessary steps to protect yourself and your property throughout the repair process.
Wear the Right Protective Gear
Your first line of defense is what you wear. Always wear gloves, safety goggles, and a dust mask when dealing with mold or removing damaged drywall. Sturdy work gloves will protect your hands from sharp edges, splinters, and any chemicals you might use. Safety goggles are non-negotiable; they shield your eyes from flying debris, dust, and splashes. A good-quality dust mask or respirator is crucial for keeping drywall dust and, more importantly, potentially harmful mold spores out of your lungs. Don’t skip this step—it’s a simple way to prevent irritation and more serious health issues down the road.
Be Mindful of Electrical Hazards
Water and electricity are a dangerous mix, and this is one area where you can’t afford to take chances. Before you start any work, you must turn off the power to the affected area at the circuit breaker. Don’t just flip a switch; go to your home’s main electrical panel and shut off the correct breaker. If you’re not 100% sure which one it is, turn off the main power. If any electrical outlets or switches were submerged or soaked, they need to be replaced, not just dried out. Internal corrosion can create a serious fire hazard later. When dealing with these risks, calling for emergency water damage services is the safest bet.
Ensure Proper Ventilation
Good airflow is your best friend during a drywall repair project. Make sure the area is well-ventilated by opening any nearby windows and doors. This serves two key purposes: it helps speed up the drying process and it clears out fumes from primers, paints, and cleaning solutions. You can also use fans to help circulate the air and dry the space more quickly. However, if you suspect there is mold, avoid using fans until the mold has been properly contained and removed, as the airflow can spread spores to other parts of your home.
Prevent Future Mold Growth
Simply replacing the drywall isn’t enough; you also need to treat the area to prevent mold from returning. After removing the damaged material and before installing the new patch, clean the exposed wall studs and surrounding drywall with an appropriate sanitizer. It’s a common misconception that bleach is the best solution, but it can be ineffective on porous surfaces and its fumes are harsh. Instead, use a special chemical cleaner or an EPA-registered antimicrobial spray designed to kill mold and bacteria. This crucial step in your environmental cleanup process ensures that your hard work lasts and your home stays healthy.
When to Call a Professional for Water Damage
While tackling a home repair project yourself can be incredibly satisfying, water damage is one area where it pays to be cautious. Some situations are simply too big, too complex, or too dangerous to handle without professional expertise. Calling in an expert isn’t admitting defeat; it’s making a smart decision to protect your home and your health. Professionals have industrial-grade equipment for water extraction and drying, moisture detection tools to find hidden dampness, and the training to handle contaminated water and mold safely. They can get your home dry much faster than you could with fans and a shop vac, which is critical for preventing secondary damage like mold growth.
Trying to manage a major water issue on your own can lead to bigger problems down the line, like persistent mold, structural decay, and lingering odors. A professional restoration company can assess the full extent of the damage—both visible and hidden—and create a plan for a thorough and safe recovery. They know how to work with insurance companies and can help you document everything properly, which can be a huge relief during a stressful time. Knowing when to step back and let an expert take over is key to getting your home back to normal quickly and correctly.
Signs You Need an Expert—Fast
Some water damage scenarios are clear-cut emergencies that require an immediate call to a professional. The most critical of these involves contaminated water. If you’re dealing with sewer backups, overflowing toilets, or floodwater from a nearby river, do not attempt to clean it up yourself. This type of water, often called “black water,” is teeming with bacteria, viruses, and other harmful contaminants that pose serious health risks. Professionals have the required personal protective equipment (PPE) and specialized cleaning agents to decontaminate the area safely and effectively, ensuring your family isn’t exposed to dangerous pathogens.
You Suspect Structural Damage
If you see signs that the water has compromised the integrity of your home, it’s time to call for help. A sagging ceiling, warped floors, or bulging walls are major red flags. That dark stain on the ceiling might seem like a simple cosmetic issue, but it could indicate that the water has saturated the drywall and is weakening the wooden joists above. Poking at it or trying to patch it without understanding the underlying issue could be dangerous. A professional assessment is crucial to determine if the structural components of your home are sound. Experts can safely diagnose the problem and perform the necessary repairs to ensure your home is secure.
The Water is Contaminated
Beyond sewage, another major contaminant to watch for is mold. If you find a patch of mold larger than a few square feet (a common guideline is about 10 square feet), you should call a professional for removal. Disturbing a large mold colony without proper containment procedures can release millions of spores into the air, spreading the problem to other areas of your home and creating a respiratory health hazard. Certified technicians understand how to set up containment zones, use air scrubbers to capture airborne spores, and properly dispose of contaminated materials. They can handle the environmental cleanup safely, giving you peace of mind that the mold is gone for good.
Related Articles
- Is My Water Damage New or Has It Been Around a While?
- The Dangers of Delaying Water Damage Repairs
- 5 Things You Should Do When Your Home Is Damaged By Water
- Is There A Hidden Water Leak Behind Your Wall?
- Be Careful With The Water That Comes From Water Damage
Frequently Asked Questions
Can I just use a stain-blocking paint over a water stain? While it might seem like a quick fix, painting over a water stain without addressing the underlying issue is a bad idea. The stain will almost certainly bleed through the new paint over time. More importantly, you’re trapping moisture inside the wall, which can lead to wood rot and create a perfect breeding ground for mold. You have to fix the leak and ensure the drywall is completely dry before you even think about priming and painting.
How long does drywall actually need to dry before I can repair it? This really depends on how saturated the area is, but you should plan for at least 48 to 72 hours of active drying with fans and a dehumidifier. The surface might feel dry to the touch much sooner, but moisture can linger deep inside the drywall and the wooden studs behind it. Rushing this step is the most common mistake people make, so it pays to be patient and give it a few days to dry out completely.
Is repairing a water-damaged ceiling different from a wall? The basic steps are similar, but working on a ceiling requires extra caution. Gravity is not on your side, so you need to be especially careful when removing damaged sections. A waterlogged ceiling is incredibly heavy and can be a collapse hazard. If you see significant sagging or the damaged area is large, it’s much safer to call a professional who can properly support the structure while making the repair.
What’s the real difference between minor and major damage? When do I cross the line? Think of minor damage as a surface-level issue, like bubbling paint or a small, firm stain where the drywall is still solid. You can usually handle this with scraping, sanding, and patching. You’ve crossed into major damage when the drywall itself is compromised—it feels soft, spongy, or crumbles when you press on it. Any sagging, bulging, or damage larger than a dinner plate also falls into this category and requires cutting out and replacing the entire section.
What should I do if I find a small amount of mold? If you find a small patch of surface mold (less than 10 square feet, or a 3×3 foot area), you can often clean it yourself with an appropriate antimicrobial cleaner. However, you must wear proper safety gear, including an N95 mask, goggles, and gloves. If the mold covers a larger area, comes back after cleaning, or you smell a strong musty odor even without seeing mold, it’s time to call in professionals for a proper assessment and safe removal.