The most dangerous part of a flood isn’t always the standing water you can see. It’s the moisture that silently wicks up behind your drywall, seeps under your floorboards, and gets trapped in your home’s insulation. This hidden dampness is where mold begins its destructive work, often completely out of sight. To truly protect your home, you have to fight the invisible threat as aggressively as the visible one. This guide focuses on the critical first 48 hours, showing you how to tackle both surface water and hidden moisture. These initial steps are the cornerstone of any effective strategy for mold prevention after flood, stopping the problem before it takes root.
Key Takeaways
- Act Fast to Minimize Damage: Your response in the first 48 hours is crucial. After confirming the area is safe, focus on removing standing water, creating airflow with fans and dehumidifiers, and taking detailed photos of everything for your insurance claim before you move or discard items.
- Clean and Disinfect to Stop Mold for Good: Drying a flooded area is only half the battle. To prevent mold from taking hold, you must first scrub all affected surfaces with a detergent to remove dirt and then follow up with a disinfecting solution to kill any lingering spores.
- Recognize the Limits of DIY Remediation: While you can handle a tiny mold spot, always call a professional for widespread growth (over 10 sq. ft.), damage from contaminated water like floods or sewer backups, or if anyone in your home has health sensitivities.
Your First 48 Hours: Immediate Steps After a Flood
When your home floods, the clock starts ticking immediately. It’s a stressful and chaotic situation, but how you respond in the first two days can have a massive impact on the outcome. Mold can begin to grow in as little as 24 to 48 hours in damp conditions, turning a water problem into a much more serious health and structural issue. Acting quickly and methodically is your best defense.
Before you even think about cleanup, your absolute first priority is safety. If there’s any chance water has reached electrical outlets or appliances, shut off the power at the breaker box. If you smell gas, leave the house immediately and call the gas company. Once you’re sure the area is safe to enter, you can shift your focus to damage control. The goal isn’t to fix everything yourself, but to take immediate, strategic steps to stop the damage from getting worse and create an environment where mold can’t thrive. These are the essential first actions you can take to get ahead of the problem while you wait for professional help to arrive.
Remove Standing Water
Your first priority is to get rid of any standing water. The longer water sits, the more it soaks into your floors, walls, and furniture, creating the perfect breeding ground for mold. For smaller amounts of water, a wet/dry vacuum can be a lifesaver. If you’re dealing with significant flooding, you may need a sump pump to remove the water more quickly. The goal is to get the bulk of the water out as fast as possible. This single step is the most important part of any emergency water damage response and dramatically reduces the extent of the long-term damage.
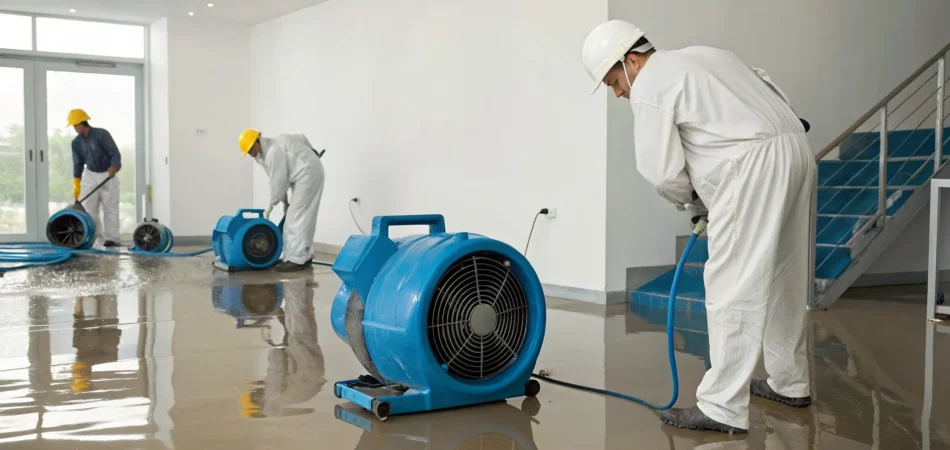
Ventilate and Circulate Air
Once the standing water is gone, your next focus is the moisture left behind in the air and absorbed by materials. You need to get the air moving to speed up the drying process. If the weather outside isn’t humid, open up all the windows and doors to create cross-ventilation. Set up fans—box fans, oscillating fans, any kind you have—to circulate air throughout the affected rooms. A dehumidifier is your best friend here; run it continuously to pull moisture out of the air. Your target is to get the indoor humidity below 60%, which makes it much harder for mold to take hold.
Document Everything for Insurance
Before you move, clean, or throw anything away, stop and document the damage. This is a crucial step for your insurance claim. Use your phone to take plenty of photos and videos of everything. Capture the height of the water lines on the walls, the damage to your furniture and belongings, and any affected structural materials like flooring and drywall. Get shots from different angles and be as thorough as you can. Once you have your evidence, call your insurance agent to report the flood and start the claims process. This documentation will be essential for getting the support you need for a complete restoration.
Remove Wet Items and Materials
Some items just can’t be saved after being saturated with water, especially porous ones. You’ll need to remove wet carpets, area rugs, and carpet padding right away—they are like giant sponges for moisture and contaminants. The same goes for upholstered furniture, mattresses, books, and cardboard boxes. While some high-value items might be salvageable with professional cleaning, most of these materials will need to be discarded to prevent mold from spreading. Getting these items out of the house reduces the overall moisture load and is a key part of the initial hauling and debris removal process.
Cut Out Damaged Drywall and Baseboards
Drywall acts like a wick, pulling water up above the visible flood line. Even if it feels dry to the touch on the surface, the insulation and wood studs behind it are likely still wet. To prevent hidden mold growth inside your walls, you’ll need to remove the affected drywall. A good rule of thumb is to measure the highest point of the water line and cut at least 12 inches above it. You should also carefully pry off and discard any baseboards in the flooded area, as water gets trapped behind them. This is a critical part of a thorough water damage restoration that ensures your home is truly dry.
How to Properly Dry Your Home and Belongings
Once you’ve removed standing water and soaked items, the race against mold begins. The next step is to thoroughly dry your home by pulling moisture from the air and structural materials. This requires the right equipment, effective techniques, and a clear understanding of the timeline.
Gather Your Drying Tools
Effectively drying a flooded space requires more than household fans. Gather high-powered fans and run them for several days, constantly moving them to target wet spots like floors and baseboards. You’ll also need commercial-grade dehumidifiers to pull moisture from the air. For the best results, close off the wet area to help them work efficiently. Professional water damage restoration teams use specialized equipment to speed up this process.
Use the Right Drying Techniques
With your tools ready, focus on technique. After removing standing water, open windows and use fans to create air circulation while running dehumidifiers to lower the room’s humidity. As a rule, discard porous materials that can’t be completely dried, such as carpets, padding, and insulation. These items trap moisture and become a breeding ground for mold. Arranging for hauling and debris removal can help clear these materials out fast.
Monitor and Control Humidity
Don’t guess if the air is dry—measure it. Use a hygrometer to monitor indoor humidity, aiming to keep it between 30% and 50%. Mold thrives in humid conditions, so maintaining this range is critical. A powerful dehumidifier is key; for significant flooding, you’ll need one that can collect 60 to 70 pints of water per day. This is what’s required to combat moisture after an emergency water damage event.
Understand the Drying Timeline
Time is not on your side. Mold can grow in as little as 24 to 48 hours after water exposure, which is why acting fast is critical. Any porous items, like drywall or furniture, that have been wet for more than 48 hours should be removed and discarded. Don’t wait to see or smell mold; by then, you already have a problem. A swift response is the best defense and a core part of any complete restoration plan.
Cleaning and Disinfecting to Stop Mold
Once everything is dry, it’s time to clean and disinfect. This step is about more than just wiping away dirt; it’s about eliminating the microscopic mold spores left behind by floodwater. Simply drying the area isn’t enough, because dormant spores can reactivate the moment moisture returns. A thorough cleaning of every affected surface—from walls and floors to furniture and fixtures—is a non-negotiable part of a successful water damage restoration project. Tackling this correctly ensures that mold doesn’t get a chance to establish a foothold in your home, protecting both your property and your family’s health. Think of this as the final defense against a future mold problem.
Choose Safe Cleaning Solutions
You have a few good options when it comes to cleaning solutions, and the right choice depends on the surface you’re cleaning. For a reliable DIY option, a simple mix of household detergent and water can be used to scrub down surfaces first. For disinfecting, you can use a solution of 5% bleach and water or a commercial mold-killing spray like Concrobium. If you prefer a natural alternative, products like Benefect use plant-based ingredients to kill germs. Always read the product label to make sure it’s appropriate for the material you’re cleaning, whether it’s wood, tile, or laminate.
Follow a Step-by-Step Cleaning Process
The key to effective cleaning is to act fast, ideally within 24 to 48 hours after the flood. Start by scrubbing all affected surfaces with a sponge or cloth and a simple detergent solution. This initial cleaning removes the layer of dirt and grime where mold spores love to hide. After you’ve cleaned an area, follow up with your chosen disinfecting solution to kill any remaining spores. Be methodical and thorough. Clean everything that floodwater touched, not just the spots that look dirty. This two-step process of cleaning then disinfecting is the most effective way to handle the situation.
Disinfect with a Bleach Solution
When you’re dealing with contamination from floodwaters, which can contain sewage and other bacteria, a bleach solution is a powerful disinfectant. For hard, non-porous surfaces, you can create an effective mix using one cup of household bleach per one gallon of water. When you apply the solution, let it sit on the surface for at least 10 minutes before rinsing or wiping it dry. It’s crucial to ensure the area is well-ventilated by opening windows and using fans. And remember, never mix bleach with ammonia or any other cleaning products, as this can create toxic gas.
Wear Protective Gear
Please don’t skip this step—your safety comes first. When you’re cleaning up mold or disinfecting after a flood, you need to protect yourself from inhaling spores and from harsh cleaning chemicals. Your essential gear should include an N-95 respirator mask, goggles that don’t have ventilation holes, and waterproof gloves that go up to the middle of your forearm. This gear protects your lungs, eyes, and skin from exposure. If the job feels too big or you’re concerned about the risks, it’s always best to call in professionals who specialize in safe environmental cleanup.
Preventing Future Mold Growth
After you’ve cleaned up the immediate mess from a flood, your focus should shift to making sure it doesn’t happen again. Taking proactive steps to prevent future mold growth is one of the most important parts of the recovery process. It’s not just about rebuilding; it’s about rebuilding smarter to protect your property and your family’s health. These long-term strategies will help you create a drier, safer home environment and give you peace of mind.
Control Your Home’s Humidity
Mold thrives in damp, humid conditions, so managing your home’s moisture levels is your top priority. Your goal is to keep the indoor humidity between 30% and 50%. You can easily track this with a small, inexpensive device called a hygrometer. To keep humidity in check, run dehumidifiers in damp areas like basements and use your air conditioner, which naturally removes moisture from the air. Make sure your kitchen and bathroom exhaust fans are working properly and use them every time you cook or shower. Good airflow and low humidity make your home a much less inviting place for mold to settle in.
Rebuild with Mold-Resistant Materials
When you begin the complete restoration of your home, you have a unique opportunity to build in an extra layer of defense against mold. As you replace damaged materials, choose products specifically designed to resist moisture. Look for mold-resistant drywall, insulation, and even special paints that contain antimicrobial agents. While these materials might have a slightly higher price tag, they are a smart investment in the long-term health of your home. Using them can prevent a small leak from turning into a major mold problem down the road, saving you significant stress and expense.
Improve Drainage and Waterproofing
Stopping water before it ever gets inside is a critical step in mold prevention. Take a walk around your property and check your landscaping and drainage. Make sure your gutters are clean and that downspouts direct water at least five feet away from your foundation. The ground should slope away from your house, not toward it. You should also inspect your foundation for any cracks and seal them promptly. Properly sealed windows and a well-maintained sump pump are also essential parts of a good waterproofing strategy, creating a strong barrier against water intrusion.
Schedule Regular Inspections
Staying vigilant is key to keeping your home mold-free. It’s important to regularly check all the areas where water might have been, not just the spots you can easily see. Make it a habit to inspect under sinks, around toilets, near water heaters, and in your attic for any signs of leaks or moisture. Catching a small issue early can prevent it from becoming a widespread problem. If you’re unsure what to look for or suspect a hidden issue, professional leak detection services can pinpoint problems before they cause significant damage, giving you a clear path to a lasting solution.
When to Call a Professional for Mold Remediation
Tackling a home project yourself can be satisfying, but mold removal isn’t your average DIY task. While you might handle a tiny spot of mildew in the shower, significant mold growth after water damage is a different story. Trying to clean it yourself without the right knowledge can actually make the problem worse by spreading invisible spores throughout your home, leading to new colonies in unexpected places. This is where professional expertise becomes essential. A certified team doesn’t just scrub away the visible mold; they address the entire problem. This includes using specialized equipment like moisture meters to find the hidden source of water that’s feeding the growth. They also establish containment zones with plastic sheeting and negative air pressure to prevent cross-contamination to other parts of your house during the removal process. Calling for a professional environmental cleanup ensures the mold is completely removed and won’t become a recurring problem, protecting both your property and your family’s health. It’s about more than just cleaning a surface; it’s a comprehensive process that restores your home to a safe condition. Knowing when to step back and let an expert take over is the smartest move you can make for your home and your peace of mind.
Know the Warning Signs
Your senses are often the first line of defense against mold. The most obvious sign is seeing it—patches of black, green, or white fuzz growing on walls, ceilings, or other surfaces. But mold isn’t always visible. A persistent, musty, earthy smell is a huge red flag that mold is hiding somewhere, perhaps behind drywall or under flooring. Since mold can start growing within 24 to 48 hours of water exposure, you should be on high alert after any leak or flood. If you notice a strange odor or see discoloration, it’s time to investigate further, as these are clear indicators of a potential problem that needs immediate attention.
If the Damage is Widespread (Over 10 sq. ft.)
There’s a general rule of thumb in the restoration industry: if the moldy area is larger than 10 square feet (roughly a 3-foot by 3-foot patch), it’s time to call a professional. A small, contained spot is one thing, but a large infestation suggests a bigger, more deep-seated moisture issue. Large colonies release a higher concentration of spores into the air, and trying to clean them without proper containment can spread the problem to other areas of your home. Professionals use containment barriers and negative air pressure to keep spores from escaping the work area, a critical step you can’t replicate with DIY methods.
If Contaminated Water is Involved
Not all water is the same. If the moisture source was contaminated, you should call for help immediately, regardless of the size of the mold patch. This includes “gray water” from overflowing washing machines or dishwashers, and especially “black water” from toilets or outside flooding. These water types contain bacteria and other dangerous pathogens that create a serious health hazard. Situations like sewer backups introduce biohazards that require specialized cleaning protocols and protective gear to handle safely. This is a job strictly for trained and certified technicians who know how to protect themselves and your home from further contamination.
If You Have Health Concerns
Your health and the health of your family should always be the top priority. If anyone in your household has asthma, severe allergies, a compromised immune system, or other respiratory conditions, you should not attempt to remove mold yourself. Mold exposure can trigger serious allergic reactions and respiratory distress in sensitive individuals. Even in healthy people, it can cause symptoms like coughing, sneezing, and eye irritation. Bringing in a professional team eliminates the risk of exposure and ensures the air quality in your home is restored to a safe, healthy level for everyone, giving you total peace of mind.
Related Articles
- Flood Damage Restoration Services: A 5-Step Guide – Drywizard Restoration & Drywall Inc.
- What to Do When Your House Floods: A Quick Guide – Drywizard Restoration & Drywall Inc.
- Flood Damage Restoration: A Step-by-Step Guide – Drywizard Restoration & Drywall Inc.
Frequently Asked Questions
How quickly do I really need to start the cleanup process? You need to act immediately. The 24 to 48-hour window isn’t just a suggestion; it’s the critical timeframe before mold can begin to grow on damp surfaces. Your first steps aren’t about making permanent repairs but about stopping further damage. Getting standing water out and starting the drying process right away is the single most important thing you can do to protect your home.
Can I save my wet furniture and carpets? This depends on the material. Unfortunately, porous items like carpets, upholstered furniture, mattresses, and particleboard are nearly impossible to dry completely and safely once they’ve been saturated. They become a perfect breeding ground for mold and should almost always be discarded. Hard, non-porous items like solid wood furniture or plastic items can often be cleaned, disinfected, and saved.
What if I can’t see any mold but there’s a persistent musty smell? That musty, earthy smell is a major red flag and almost always indicates hidden mold growth. Mold thrives in dark, damp places like behind drywall, under floorboards, or in your insulation. If your nose is telling you something is wrong, listen to it. This is a clear sign that you should call in a professional to find the source of the moisture and assess the situation.
Is it safe to stay in my home after a flood? Your immediate safety is the top priority. If water has reached electrical outlets, you must turn off the power at the breaker. Beyond that, you have to consider the water itself. Floodwater can be contaminated with sewage and other bacteria, creating a health hazard. If the damage is significant or involves contaminated water, it’s often safest to find another place to stay until the home has been professionally cleaned and dried.
My insurance company said to wait for an adjuster before touching anything. What should I do? This is a common and tricky situation. While you shouldn’t throw anything away permanently before the adjuster sees it, your insurance policy also requires you to mitigate further damage. You should absolutely take photos and videos of everything first, then proceed with immediate steps like removing standing water, pulling up soaked carpet, and setting up fans. Documenting your actions shows the adjuster you were acting responsibly to prevent the problem from getting worse.