After the stress of a home emergency like a burst pipe or a kitchen fire, the path to normalcy begins with rebuilding. Once the water is extracted or the smoke has cleared, you’re often left with exposed wall studs and the task of putting everything back together. This is where drywall installation and finishing becomes a critical step in making your house feel like a home again. It’s about more than just covering up the framing; it’s about restoring your space with a clean, seamless finish. This guide will cover the entire process, helping you understand what quality work looks like and what it takes to restore your walls perfectly.
Key Takeaways
- Plan your project to prevent common mistakes: Before starting, choose the right type of drywall for the room’s function—like moisture-resistant panels for bathrooms—and gather all your tools to avoid mid-project interruptions.
- Achieve a seamless finish with thin, patient layers: A professional look comes from applying multiple thin coats of joint compound and allowing each one to dry completely, which is the key to preventing cracks and creating a durable, smooth surface.
- Recognize when to hire a professional: While you can handle small patches, always call a certified expert for large-scale projects or any repairs resulting from water or fire damage to address hidden issues like mold and structural problems.
What is Drywall Installation and Finishing?
Think of drywall installation as the process of building your interior walls and ceilings. It involves measuring your space, cutting large sheets of gypsum board to size, and fastening them to the wall studs or ceiling joists. While the concept is straightforward, the work itself can be messy and physically demanding, often taking several days to complete. It’s a foundational step that transforms a bare frame into defined rooms.
Once the drywall sheets are hung, the finishing process begins. This is where the real artistry comes in, as it’s all about making the seams between the panels disappear to create a single, smooth surface. Finishing involves applying paper or mesh tape over the joints and corners, then spreading multiple thin layers of joint compound (often called “mud”) over the tape. Each layer is sanded smooth after it dries, resulting in a flawless canvas that’s ready for primer and paint. This meticulous process is what gives your walls their polished, professional look and is a crucial part of any complete restoration project.
Choosing the Right Drywall for Your Project
Not all drywall is created equal, and choosing the right type is essential for long-lasting results. The key is to match the drywall to the room’s environment and function. For instance, in a garage, you’ll want to use a thicker, fire-resistant drywall for added safety. In areas prone to dampness, like basements or bathrooms, it’s best to use a moisture- or mold-resistant panel. You might hear these referred to as “green board” or “purple board” because of the color of their paper facing. Using the correct materials from the start can help prevent serious issues, like those that require water damage restoration.
DIY vs. Hiring a Pro: Making the Call
Deciding whether to tackle a drywall project yourself or hire a professional comes down to balancing your budget, timeline, and desired quality. Going the DIY route can certainly save you money on labor, but it requires a significant investment of time and a lot of patience to get right. It’s often best suited for small repairs or simple projects. On the other hand, hiring a pro costs more upfront—typically between $1.50 and $3.50 per square foot for labor—but it’s the surest way to get smooth, high-quality walls, especially for larger jobs or in main living areas where the finish really matters. When you want flawless results without the headache, it’s always best to contact us for a professional touch.
Your Drywall Project Shopping List
Walking into a hardware store can feel overwhelming, but it doesn’t have to be. Getting your drywall project started on the right foot is all about having the right gear from the get-go. A well-prepared shopping list saves you time and prevents those annoying mid-project trips back to the store. Whether you’re patching a small hole or tackling a larger job as part of a complete restoration, this checklist covers the essentials you’ll need to achieve a professional-looking result. Think of this as your game plan for a smooth, successful project.
Essential Installation Tools
First, let’s talk tools. You’ll want two different taping knives: a smaller 5-inch knife for embedding your tape into the joint compound and a wider 10-inch knife for applying those smooth, feathered finishing coats. For the compound itself, grab a bucket of premixed all-purpose joint compound—it’s ready to use and perfect for beginners. When it comes to tape, go with paper tape. It’s stronger than mesh and creates a crisper corner. Finally, for sanding, a pole sander will be your best friend for large wall areas, while a simple sanding block is great for getting into tight corners and detailed spots.
Supplies for a Smooth Finish
With your tools sorted, it’s time for the core materials. You’ll obviously need your drywall sheets and the correct length of drywall screws. To drive those screws perfectly every time, pick up a drywall dimpler bit for your drill. This handy little attachment sets the screw just below the paper surface without tearing it, which is crucial for a clean finish. You’ll also need a sharp utility knife for cutting the drywall sheets to size and a drywall rasp to smooth out any rough edges after you make a cut. These simple supplies are the foundation of a solid installation.
Don’t Forget Your Safety Gear
This part is non-negotiable. Drywall dust is incredibly fine and gets absolutely everywhere, so protecting yourself is a must. At a minimum, you need a good quality dust mask to keep from breathing in all that fine particulate. Your eyes need protection, too, so be sure to wear safety glasses to shield them from dust, debris, and any stray bits of compound. Taking these simple precautions makes the entire process safer and much more comfortable. It’s a small step that makes a huge difference in your overall experience and well-being during the project.
A Step-by-Step Guide to Installing Drywall
Ready to hang some drywall? It might seem like a job reserved for the pros, but with the right approach, it’s a project you can definitely tackle. Breaking the process down into clear, manageable steps is the key to success. Whether you’re finishing a basement or patching up a wall, this guide will walk you through the fundamentals of a solid installation. Remember, patience is your best friend here. And if you’re working on a project that involves fixing previous damage, our complete restoration services can ensure the underlying issues are solved before you hang new walls.
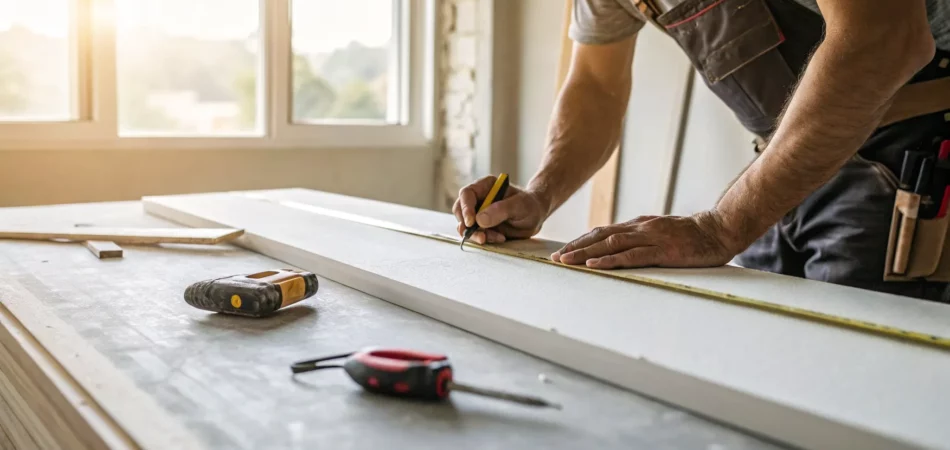
Measure and Plan Your Layout
Before you make a single cut, grab your tape measure and a notepad. The old saying “measure twice, cut once” is your mantra for this step. Carefully measure the height and width of the walls you need to cover. It’s a good idea to measure the width in a few different spots from top to bottom, as walls aren’t always perfectly square. Jot down these measurements and sketch a simple diagram of the room. This drawing will be your roadmap, helping you plan where each sheet of drywall will go and minimizing waste. Planning your layout now saves you from headaches and extra trips to the hardware store later.
Cut and Fit the Drywall Sheets
Once you have your plan, it’s time to cut the drywall sheets to size. Place a sheet on a flat surface with the white paper side facing up. Using a T-square or another long straight edge, mark your measurements with a pencil. Now, run a sharp utility knife along your marked line, pressing firmly enough to score through the paper and into the gypsum core. You don’t need to cut all the way through. Simply stand the sheet on its edge and give it a firm bump from the back to snap it cleanly along the scored line. If it doesn’t break perfectly, you can use your knife to cut the paper on the back.
Secure the Panels to Wall Studs
With your first piece cut, it’s time to hang it. Press the drywall sheet firmly against the wall studs. To attach it, use a drill equipped with a drywall dimpler bit—this special bit prevents you from driving the screws too deep and breaking the paper face, which can compromise the hold. Start screwing from the center of the panel and work your way out toward the edges to keep the sheet flat against the studs. Place screws about every 12 to 16 inches along each stud. The goal is for the screw head to sit just below the surface of the paper, creating a small dimple you’ll later fill with joint compound.
Work Around Outlets and Fixtures
Walls rarely have uninterrupted surfaces, so you’ll need to account for electrical outlets, light switches, and other fixtures. Before you hang a panel that will cover one of these, you have to measure its exact location. Measure from the floor up to the bottom of the box and from the nearest corner to the side of the box. Transfer these measurements to your drywall sheet and draw the outline of the box. You can cut this out carefully with a utility knife or a special drywall saw. It’s always better to cut the hole slightly small at first; you can always trim it to be a little bigger, but you can’t shrink it.
What Are the Levels of Drywall Finishing?
You might be surprised to learn that not all drywall finishes are created equal. The smooth, paint-ready wall you picture in your living room is the result of a specific finishing process. The construction industry uses a standardized system, with levels ranging from 0 to 5, to define the quality of a drywall finish. Think of it as a scale of smoothness and perfection. A lower level involves minimal work and is meant for areas you won’t see, while a higher level requires more coats of compound, more sanding, and a lot more skill to achieve a flawless surface.
Choosing the right level is a crucial step, especially when you’re trying to make a repaired section blend seamlessly with an existing wall after a complete restoration. The level of finish directly impacts how your final paint or wallpaper will look. A glossy paint on a low-level finish will highlight every tiny bump and seam, while a high-level finish creates a perfect canvas that makes any paint job look professional. Understanding these levels helps you communicate exactly what you want to your contractor and ensures you get the results you’re paying for.
A Breakdown of Levels 0 Through 5
Each level of drywall finishing corresponds to a specific application and amount of work involved. Here’s a quick rundown of what each level means for your walls:
- Level 0: This is as basic as it gets—just the drywall panels fastened to the studs. There’s no taping or finishing at all. You’ll only see this in temporary construction.
- Level 1: Here, joint tape is embedded in compound, but that’s it. It’s for areas hidden from view, like attics or service closets.
- Level 2: This level adds a thin coat of compound over the tape and screw heads. It’s a step up, suitable for garages, storage areas, or walls that will be covered with tile.
- Level 3: A second coat of compound is applied. This is a good choice if you plan to apply a heavy texture or use thick, commercial-grade wallpaper.
- Level 4: This is the standard for most residential walls. It includes another coat of compound and careful sanding for a smooth surface that’s ready for primer and paint.
- Level 5: The highest quality finish. It involves applying a thin skim coat over the entire drywall surface for a perfectly uniform, glass-smooth wall.
How to Choose the Right Finish for Your Space
So, how do you pick the right level for your project? It really comes down to the room’s function and the final look you want. For most interior walls in your home that will be painted with a flat or eggshell finish, a Level 4 finish is the go-to standard. It provides a great-looking surface that meets the needs of the average room.
However, if you’re planning to use a semi-gloss or high-gloss paint, or if the room gets a lot of natural light that will cast shadows across the wall, you should consider a Level 5 finish. This premium finish is ideal for formal living rooms, dining rooms, or any space where you want a truly flawless appearance. After an emergency like a burst pipe, opting for a Level 5 finish can make the restored wall look even better than the original.
Techniques for a Professional-Looking Finish
The difference between a DIY drywall job and a professional one almost always comes down to the finishing work. This is where patience and technique really pay off. Getting those seams, corners, and screw holes to disappear is an art form, but it’s one you can learn with the right approach. A flawless finish ensures your paint job looks fantastic and your walls are perfectly smooth. Whether you’re finishing a new room or repairing a wall after an emergency, these steps are the key to a seamless result.
After dealing with something like a burst pipe, getting the walls back to their original state is a top priority. The final steps of taping, mudding, and sanding are what make the evidence of any water damage restoration completely vanish. It’s not just about patching a hole; it’s about blending the repair so perfectly that no one would ever know it was there. Taking your time here will make all the difference in the final look and feel of your space.
How to Tape Joints and Corners
Taping is the first and most critical step in creating invisible seams. The tape bridges the gap between drywall sheets, providing strength and preventing cracks from forming later on. Start by applying a thin, even layer of joint compound over the seam with a 5-inch knife. Then, press paper tape firmly into the wet compound. To embed the tape properly and remove any excess mud, smooth it with your knife, working from the middle of the seam outwards. You want the tape to lie perfectly flat without any air bubbles trapped underneath. This process creates a solid foundation for the next coats of compound.
Apply Coats of Joint Compound
Applying joint compound, or “mud,” is a multi-layer process. The first coat secures the tape and fills the screw or nail divots. Using a 5-inch knife, push the compound into the joints and over any fasteners, smoothing it out at a slight angle. Let this coat dry completely—usually for about 24 hours. Rushing the drying time is a common mistake that can lead to cracks and a weak finish. Once it’s dry, you can give it a light sanding to knock down any high spots before moving on to the next coat. Each subsequent coat will use a wider knife to feather the edges further.
Sand for a Perfectly Smooth Surface
Sanding is what blends everything together for that perfectly smooth surface you’re after. After your second or third coat of compound is dry, it’s time to sand. The key is to use gentle, even pressure. If you sand too aggressively, you can scuff the drywall paper or even sand right through the tape, which means you’ll have to start that section over. For the best results, “feather” the edges by applying less pressure as you move away from the center of the joint. This creates a gradual, invisible transition from the seam to the wall. A pole sander works great for large, flat areas, while a sanding block gives you more control in corners.
Prime and Add Texture
Before you even think about painting, the wall needs to be primed. Joint compound and drywall paper absorb paint differently, and without a primer, your final paint job will look blotchy and uneven. A good quality drywall primer-sealer will seal the surface and create a uniform base for your paint to adhere to. After sanding, wipe down the walls with a damp cloth to remove all the dust, let it dry, and then apply your primer. This is also the stage where you can add texture, like orange peel or knockdown, if you want to match existing walls or hide very minor imperfections. This final prep work is essential for any complete restoration project.
Common Drywall Mistakes to Avoid
A great drywall finish is all about the details. While it can be a rewarding DIY project, a few common missteps can turn a smooth wall into a bumpy, uneven mess. Knowing what to watch for is the first step toward a professional result. Whether you’re tackling a small patch or a full room, avoiding these errors will save you time, frustration, and the headache of having to do it all over again.
Installation Errors to Watch For
Hanging drywall seems simple, but a few early mistakes can cause problems. One of the most common issues is using the wrong thickness. If you’re patching a wall after repairing a burst pipe, for example, make sure your new panel matches the existing drywall perfectly to avoid a noticeable ridge. Another frequent error is driving screws too deep. This can break the paper face and crush the gypsum core, meaning the screw is no longer holding anything. A drywall dimpler bit for your drill is a fantastic tool that sets the screw at the perfect depth, creating a small divot that’s easy to fill.
Finishing Goofs That Ruin the Look
The finishing stage is where your walls really take shape, but it’s also where many projects go wrong. The goal is to make the joints between panels completely invisible, but piling on too much joint compound creates lumps that are difficult to sand down. Instead, apply thin, even coats and feather the edges out smoothly. Rushing the process or sanding too aggressively can scuff the drywall paper, creating a fuzzy texture that will show through your paint. A flawless finish is a critical part of any complete restoration project.
The Importance of Proper Drying Times
Patience is truly a virtue when finishing drywall. Joint compound needs to dry completely between each coat, and rushing this step is a recipe for disaster. Applying a new layer over damp mud can lead to cracking, bubbling, and a weak joint that will fail over time. As a rule, wait at least 24 hours between coats. You’ll know it’s ready when the compound is bright white with no dark, gray spots. In Florida’s humid climate, drying can take even longer. This is especially critical during a water damage restoration job, where managing moisture is key to a successful repair.
How Much Does a Drywall Project Cost?
Budgeting for a drywall project can feel a bit like guessing, but it doesn’t have to be. While every project is unique, understanding the key cost components will help you plan with confidence. The final price tag generally breaks down into two main categories: materials and labor. On average, you can expect to pay somewhere between $1.50 and $3.50 per square foot for professional drywall installation, which covers everything from the panels to the final sanding.
The size and complexity of your project are the biggest factors influencing this range. A simple, square room will naturally cost less than one with tricky angles, high ceilings, or lots of windows and outlets to work around. Each of these features adds time and requires more precise cuts and finishing work. The type of drywall you choose and the level of finish you want also play a significant role. For example, a basic garage wall that just needs to be functional will be much cheaper than a perfectly smooth living room ceiling that’s ready for a flawless coat of paint. Whether you’re finishing a basement or handling repairs as part of a larger complete restoration project, knowing these variables will help you set a realistic budget from the start.
Breaking Down Material Costs
Let’s start with the drywall itself. Standard drywall sheets typically cost between $0.50 and $0.80 per square foot. However, you might need a specialty type depending on the room. For bathrooms, kitchens, or any area prone to moisture, you’ll want to use moisture-resistant drywall (often called “green board”), which runs about $12 to $20 per sheet. For added safety in garages or near furnaces, fire-resistant drywall is a smart choice, costing around $11 to $12 per sheet. If you’re creating a home theater or office, soundproof drywall can make a huge difference, though it’s a bigger investment at $40 to $60 per panel. These specialty boards are crucial for ensuring your walls last, especially after a water damage restoration job.
Factoring in Labor and Your Timeline
Labor is the largest piece of the puzzle, usually making up about 65% to 75% of the total project cost. Professional labor rates for hanging and finishing drywall typically range from $1.00 to $2.70 per square foot. This fee covers the skill and time required to get those seamless, professional results. Finishing drywall isn’t a one-day job; it’s a multi-step process. Each layer of joint compound, or “mud,” needs to dry completely before the next one can be applied and sanded. For a single room, this can take a few days. For a larger project, like an entire 2,000-square-foot home, a skilled crew might take about a week to get everything perfectly smooth and ready for primer.
When to Call in the Pros
While tackling a drywall project yourself can be rewarding, some situations are best left to experienced professionals. Knowing when to hand over the reins can save you time, prevent costly mistakes, and ensure the job is done safely and correctly, especially when property damage is involved.
For Complex Jobs and Flawless Results
Let’s be honest, some home projects are perfect for a weekend DIY. Hanging a small patch of drywall? You can probably handle that. But finishing an entire basement or a room with high ceilings is a different story. Drywall installation is messy, physically demanding, and takes several days to get right. If you’re tackling a large or complex area where a seamless finish is non-negotiable, calling a professional is the smartest move. A pro has the experience and specialized tools to work efficiently and achieve a flawless result that’s difficult for a beginner to replicate. When you decide to hire someone, be sure to get a few quotes, check their past work, and read recent reviews to ensure they can deliver the quality you expect.
After Water Damage or an Emergency
If your drywall damage is the result of a leak, flood, or fire, this is not a DIY situation. Damaged drywall is often just the visible symptom of a much bigger problem. Behind that wall, you could be dealing with trapped moisture, mold growth, or structural issues that need immediate attention. Simply patching it up can lead to serious health hazards and more expensive repairs down the road. This is when you need a certified restoration specialist. Our team provides expert water damage restoration and fire & smoke restoration, handling everything from cleanup to completely rebuilding the affected area. We understand the urgency and offer 24/7 emergency services to protect your property.
How to Care for Your New Walls
Once the dust has settled and the paint is dry, you want to keep your new walls looking pristine for years to come. The good news is that proper care starts with the quality of the installation itself. A professional finish, complete with proper taping and sanding, creates a durable surface that’s easy to maintain and resists common issues like cracking or peeling down the road. Think of it as setting your walls up for success from day one.
After the installation, a few simple habits can make all the difference. From routine cleaning to preventing accidental damage, a little mindfulness goes a long way. And if you ever notice signs of trouble, like discoloration or soft spots, it’s always best to address them quickly to prevent a small issue from becoming a major headache. Taking care of your walls is really about taking care of your home’s overall health and value.
Cleaning and Everyday Maintenance
Before you start scrubbing, give your new paint plenty of time to cure. While it might feel dry to the touch in a day, most paints need a few weeks to fully harden. During this time, be extra gentle. For general cleaning later on, a soft cloth or sponge with mild, soapy water is usually all you need to wipe away smudges and dust. Avoid abrasive cleaners or harsh scrubbing pads, as they can damage the paint finish. A high-quality primer and paint job will make your walls much more washable and resistant to stains.
Preventing Scuffs and Scratches
Accidents happen, but you can easily minimize them. Simple things like placing doorstops to prevent doorknobs from hitting the wall or adding felt pads to the back of picture frames can save you from annoying dings. When moving furniture, take an extra moment to lift pieces instead of dragging them along the walls. In a humid climate like Florida’s, it’s also smart to manage indoor moisture levels with dehumidifiers or proper ventilation to protect your drywall from the long-term effects of moisture, which can lead to much bigger problems than a simple scuff.
Long-Term Awareness for Your Home
Caring for your walls also means being aware of what’s underneath, especially in older homes. If your house was built before the late 1970s, there’s a chance the original walls contain lead paint. Disturbing it during a repair or renovation can release harmful dust. Similarly, some materials used in homes built before the mid-1980s could contain asbestos. If you suspect you might be dealing with these materials, it’s crucial to call in professionals who are equipped for safe environmental cleanup rather than attempting a DIY fix.
Related Articles
Frequently Asked Questions
How long does a typical drywall project take from start to finish? A common misconception is that finishing drywall is a quick, one-day job. The reality is that it’s a multi-day process, and the biggest factor is drying time. Each layer of joint compound needs to dry completely before you can sand it and apply the next coat. In Florida’s humidity, you should plan for at least 24 hours between each of the two or three coats, meaning a single room can easily take three to four days to be fully prepped for primer.
My drywall got wet from a small leak. Can I just let it dry out? It’s tempting to just point a fan at a wet spot and hope for the best, but this is a risky approach. Once the paper and gypsum core of the drywall are saturated, they lose their structural integrity and become a prime breeding ground for mold, which can grow unseen behind the wall. The safest course of action is always to cut out and replace the affected section to ensure the wall cavity can dry properly and prevent any long-term issues.
Is it really necessary to prime new drywall before painting? Yes, absolutely. This is a step you should never skip. The joint compound and the drywall paper absorb paint at very different rates. If you paint directly onto the finished wall, you’ll likely see a blotchy, uneven sheen where the seams and screw spots are. A quality drywall primer-sealer seals both surfaces, creating a uniform base that ensures your final paint color looks smooth and consistent.
What’s the difference between paper tape and mesh tape for the seams? While you’ll see both at the hardware store, most professionals prefer paper tape for a reason. Paper tape is stronger and creates crisper, more durable corners and seams that are less likely to crack over time. Mesh tape can be a bit easier for a beginner to apply since it’s self-adhesive, but it’s not as strong and requires a setting-type compound to be effective, which can be tricky to work with. For long-lasting results, paper tape is the superior choice.
I only have a small hole to patch. Do I still need to follow all these steps? While you won’t be hanging full sheets, the fundamental finishing process remains the same, just on a smaller scale. To make a patch truly disappear, you still need to properly tape the edges, apply multiple thin coats of joint compound, and feather the edges far beyond the patch itself. You’ll also need to sand it smooth and prime the area before painting. Skipping these steps is what leads to a repair that’s still visible after you’ve painted.