A bathtub leaking into the ceiling below is much more than a simple water stain; it’s a warning sign of hidden dangers brewing within your home’s structure. While the visible damage is concerning, the real threat is the moisture you can’t see. This trapped water soaks into drywall, weakens wooden support beams, and creates the perfect dark, damp environment for mold to thrive in as little as 24 hours. Ignoring the problem won’t make it go away—it will only lead to more extensive and expensive repairs down the road. Understanding the risks of structural rot and potential health hazards is the first step in realizing why immediate action is so important.
Key Takeaways
- Check the Basics First: Your leak is likely caused by something simple, like worn-out caulk or a loose drain seal. A few simple tests—like running the shower or filling the tub separately—can help you pinpoint the problem without tearing into your ceiling.
- Act Fast to Minimize Damage: As soon as you spot a leak, shut off the water supply to stop the flow. Then, take clear photos of the damage for your insurance claim before moving any furniture or placing buckets to catch drips.
- Recognize When to Call a Professional: If you can’t find the source of the leak, the ceiling is sagging, or the damage seems widespread, it’s time to call for help. These are signs of a bigger issue that requires professional equipment to prevent structural damage and mold growth.
Why Is My Bathtub Leaking Through the Ceiling?
Seeing a damp spot on your ceiling is an instant stomach-dropper. When it’s right below a bathroom, your mind immediately goes to the bathtub. You’re right to be concerned—a leaking tub can cause serious problems, from mold growth to structural damage. The good news is that most leaks come from just a few common culprits. Figuring out the “why” is the first step to fixing the problem and preventing further damage. Let’s walk through the most likely reasons your bathtub is leaking through the ceiling.
Drain and Overflow Problems
Two of the most common sources of a bathtub leak are the drain and the overflow plate. The drain at the bottom of your tub has seals and gaskets that can wear out, crack, or become dislodged over time, allowing water to seep out every time you drain the tub. Similarly, the overflow drain—that small plate with holes near the top of the tub—is designed to prevent a flood, but its gasket can also fail. As these components age, they become brittle and can no longer create a watertight seal, leading to slow drips that cause major emergency plumbing issues below.
Faulty Plumbing Connections
Beneath and behind your tub is a network of pipes and connections that handle both the water supply and drainage. The P-trap, the curved pipe under the drain, or the connections to the hot and cold water lines can become loose or corrode over the years. A slow, persistent drip from one of these fittings might not be noticeable at first, but eventually, the water will saturate the subfloor and drywall, appearing as a stain on the ceiling below. If you suspect a hidden plumbing issue, professional leak detection services can pinpoint the exact source without unnecessary demolition.
Cracks in the Bathtub
Even a tiny, hairline crack in the surface of your bathtub can lead to a significant leak. Fiberglass and acrylic tubs, in particular, can develop small stress fractures over time that are easy to miss. Water from your shower or bath can seep into these cracks, bypass the waterproof seals, and travel down to the ceiling below. A good way to check for this is to plug the drain, fill the tub with a few inches of water, and watch closely to see if any water seems to move toward a specific spot or disappear without the drain being open.
Failed Caulk and Sealant
The caulk line around the edge of your tub and along the walls is your first line of defense against water intrusion. Over time, caulk can shrink, crack, and pull away from the surfaces, creating gaps. Every time you shower, water splashes against the walls and runs down into these gaps, seeping behind the tile and into the wall cavity. This is one of the most frequent yet overlooked causes of bathroom leaks. Once water gets into the wall, it can cause extensive water damage restoration needs, including rot and mold growth, before ever showing up on the ceiling.
How to Find the Source of the Leak
Okay, let’s play detective. Finding the exact source of the leak is your first mission, and it will help you understand what to do next. A little investigation now can save you a lot of guesswork later. By narrowing down the cause, you’ll be able to give a clear report to a professional if you need to call one. These simple steps will help you trace the water back to its origin without needing any special tools. Just grab a flashlight and a few paper towels, and let’s get started.
Start With a Visual Inspection
Before you run any water, begin with a simple visual check. Sometimes, the culprit is hiding in plain sight. Use a flashlight to get a good look at all the visible components of your tub. Carefully inspect the area around the faucet, handles, and the base of the tub spout. Check the caulk lines where the tub meets the floor and walls for any cracks or gaps. If you have an access panel for your tub’s plumbing, open it up and look for drips, moisture, or water stains on the pipes and the floor below.
Run a Few Water Tests
If a visual inspection doesn’t reveal the source, it’s time to see the leak in action. A great method is the paper towel test. Place dry paper towels under the tub drain, around the overflow plate, and near any visible supply lines. Then, test each function of the tub one by one. First, run the shower for a few minutes and check which paper towel gets wet. If nothing happens, plug the drain and fill the tub a few inches, watching for drips. Finally, drain the water and check again. This process helps you isolate whether the leak is related to the water supply, the drain, or the tub itself.
Check the Plumbing Connections
If you notice the leak only happens when you’re draining the tub, the problem is likely with the drain assembly. This includes the P-trap—that U-shaped pipe under the tub designed to block sewer gases. Over time, the connections on the drain can loosen, or the rubber gaskets that create a seal can wear out and fail. A rusted pipe could also be the cause. While tightening a loose connection can sometimes be a simple fix, working with older plumbing can be tricky. If you’re not comfortable with this step, it’s a good time to call for emergency plumbing assistance.
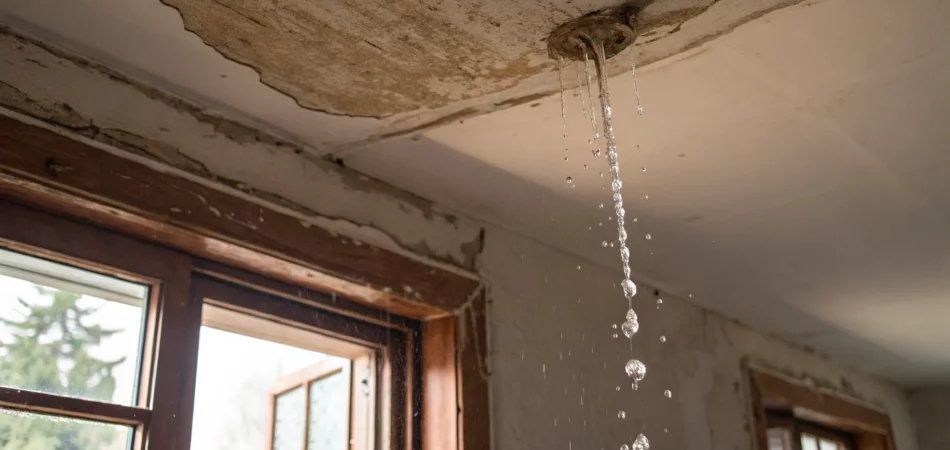
Look for Telltale Signs on the Ceiling
The damage on the ceiling below is a major clue. Look for brownish-yellow water spots, which are a classic sign of a slow, persistent leak. You might also see peeling paint, bubbling drywall, or even a noticeable sag in the ceiling. The location of the damage often corresponds directly to the source of the leak above it. Remember, by the time you see visible stains, water has already been soaking into the ceiling materials for some time. This means you’ll need professional water damage restoration to properly dry the area, check for structural issues, and prevent mold growth.
Found a Leak? Here’s What to Do Right Now
Discovering a water stain spreading across your ceiling is a moment of pure panic. But before you get overwhelmed, take a deep breath. The next few minutes are critical for minimizing damage, and knowing exactly what to do can make all the difference. Acting quickly and methodically will protect your home, your belongings, and your peace of mind.
Your immediate goals are simple: stop the water, protect your property, and stay safe. This isn’t the time to figure out the long-term fix; it’s about immediate damage control. By following a few straightforward steps, you can contain the situation while you wait for professional help to arrive. Think of it as first aid for your home. From shutting off the water supply to documenting the scene for your insurance claim, each action you take now will set you up for a smoother and less stressful restoration process. Let’s walk through exactly what you need to do, step by step.
Shut Off the Water and Assess the Damage
Your absolute first move is to stop the source of the water. If you can easily identify that the leak is coming from the bathtub, stop using it immediately. If the leak is active, you’ll need to shut off the water supply. You can often find a shut-off valve for the specific fixture in the bathroom or an access panel behind the tub. If you can’t find it or aren’t sure, don’t hesitate to turn off the main water supply to your entire house. Once the water is off, take a moment to assess the situation. A wet spot on the ceiling almost always points to a problem directly above it, like an upstairs bathroom. This initial assessment will be valuable information when you call for emergency water damage services.
Document Everything for Insurance
Before you move a single thing, grab your phone and start documenting. Take clear photos and videos of the leak, the stained ceiling, any dripping water, and the affected areas in the room below. Capture the damage from multiple angles. This evidence is crucial for your homeowner’s insurance claim. Water damage accounts for a significant portion of all claims, so having thorough documentation from the very beginning will streamline the process and support your case. Once you have your initial photos, you can start moving items, but be sure to also photograph any damaged belongings. This simple step can save you major headaches when it’s time to file your water damage restoration claim.
Protect Your Property and Belongings
With the water off and the damage documented, it’s time to protect your stuff. Place buckets, pans, or plastic bins directly under any drips to catch the water and prevent further damage to your floors. Use old towels to soak up any water that has already pooled. If the leak is significant, move furniture, electronics, rugs, and any other valuable or sentimental items out of the affected area. If you can’t move a large piece of furniture, try to protect its legs by placing them on wood blocks or wrapping them in plastic wrap. The goal is to create a safe, dry zone and prevent secondary damage while you wait for professionals to arrive and later remove damaged items.
Follow Key Safety Precautions
Water and electricity are a dangerous combination. If water is dripping near light fixtures, outlets, or electrical panels, your top priority is to turn off the electricity to that area. Go to your home’s circuit breaker and flip the switch for the affected room or rooms. Do not touch any electrical devices or switches if you are standing in water or if the area is wet. A slip-and-fall is another real hazard, so be mindful of wet floors and place towels down to create a safer path. If you suspect the leak is part of a larger emergency plumbing issue, like a burst pipe, it’s even more critical to prioritize safety until a professional can assess the situation.
Simple DIY Fixes for Minor Leaks
If you’ve caught the leak early and the water damage seems minimal, you might be able to tackle the repair yourself. A little DIY can save you time and money, but it’s important to know your limits. These fixes are for small, straightforward issues. If you open up a wall and find extensive moisture or mold, it’s time to put the tools down and call for professional water damage restoration. Your safety and your home’s integrity are what matter most.
Repairing Caulk and Sealant
One of the most common culprits behind a bathtub leak is old, failing caulk. Over time, the sealant around your tub can crack, shrink, or peel away, creating a direct path for water to seep into your walls and the ceiling below. The good news is that this is often a simple fix. Start by using a utility knife or a caulk removal tool to scrape away all the old material. Clean the surface thoroughly with rubbing alcohol to remove any soap scum or residue, and let it dry completely. Then, apply a fresh, even bead of 100% silicone kitchen and bath sealant. Smooth the bead with a wet finger or a caulking tool for a clean, watertight seal.
Tightening Loose Connections
Sometimes, a leak is just a matter of a loose connection that needs a little tightening. If you have an access panel, take a look at the plumbing directly behind or under your tub. Check the large slip nuts on the curved drainpipe (the P-trap) and the connections where the water supply lines meet the faucet. If you see a slow drip, you can often stop it by gently tightening the connection with a pair of channel-lock pliers. Be careful not to overtighten, as this can crack the plastic fittings and make the problem worse. If a gentle tightening doesn’t solve it, the internal washer or gasket may have failed. If you’re not comfortable with that, our emergency plumbing team is always ready to help.
Replacing Drain Seals and Gaskets
The rubber gaskets that seal your tub’s drain and overflow plate don’t last forever. With age, they can become brittle and crack, allowing water to escape. Replacing them is a bit more involved but is a common DIY repair. You’ll need to remove the overflow plate (usually held by one or two screws) and unscrew the main drain flange from the tub. This might require a special tool called a drain key. Once it’s out, you can replace the old, worn-out gasket underneath. For the main drain, be sure to apply a fresh ring of plumber’s putty under the flange before screwing it back in to create a perfect seal.
Tools and Materials You’ll Need
You don’t need a professional-grade workshop to handle these minor repairs, but having the right tools on hand makes the job much easier. Before you get started, gather a basic toolkit to avoid multiple trips to the hardware store. Most of these simple fixes can be done with items you may already have.
Here’s a quick checklist of what you’ll likely need:
- Utility knife or caulk removal tool
- Waterproof silicone caulk and a caulk gun
- Channel-lock pliers or an adjustable wrench
- A set of screwdrivers (both Phillips and flathead)
- Replacement gaskets and seals for your specific drain
- Plumber’s putty
- A bucket and some old rags for cleanup
When to Put Down the Wrench and Call a Pro
There’s a certain satisfaction that comes with fixing something yourself. But when it comes to plumbing and water damage, knowing your limits is the most important skill you can have. A small leak can quickly spiral into a major disaster if not handled correctly. Pushing your DIY skills too far can lead to more extensive damage, higher repair bills, and a lot more stress. Sometimes, the best and most cost-effective move is to step back and call in a team with the right tools and experience. If you’re facing a persistent leak, it’s crucial to recognize when the job has moved beyond a simple fix and requires professional intervention to protect your home and your peace of mind.
Signs You Need a Professional
If you’ve done some initial investigating but still can’t find the source of the leak, it’s a clear sign the problem is hidden. Leaks within walls, floors, or complex plumbing systems require an expert eye. Another major red flag is if the leak seems to be coming from a supply line or requires cutting into your ceiling or walls to access. Don’t reach for the saw just yet. If you see any signs of significant water damage—like sagging ceilings, warped floors, or discolored drywall—the issue has likely been going on for a while. At that point, you’re dealing with more than just a leak; you’re dealing with its destructive aftermath.
When the Repair is Beyond a DIY Fix
While you can certainly handle reapplying caulk or tightening a loose fitting, some problems are simply too complicated for a weekend warrior. If the leak only happens under specific conditions, like when the tub is draining, it could point to an issue with the P-trap or drain assembly hidden below the floor. Accessing these components often requires demolition and specialized plumbing knowledge. Any repair that involves soldering pipes, dealing with main water lines, or replacing sections of your plumbing system falls squarely into professional territory. Trying to tackle these complex jobs without proper training can easily make the problem worse, turning a contained leak into a full-blown flood.
If You Suspect Water or Structural Damage
Ignoring a leak, even a small one, can cause serious and expensive damage to your home’s structure. Water intrusion weakens wood, compromises drywall, and can lead to dangerous mold growth. If the ceiling below the tub is soft, sagging, or showing dark stains, you need professional help immediately. These are signs that water has saturated the materials, potentially affecting the structural integrity of your home. A professional team can not only fix the leak but also handle the necessary environmental cleanup and restoration. They have the equipment to dry out the structure properly and ensure your home is safe and sound.
The Dangers of Ignoring a Bathtub Leak
It’s easy to dismiss a small, discolored spot on the ceiling as a minor issue you’ll get to later. But when it comes to water, “later” can mean the difference between a simple fix and a major renovation. A seemingly insignificant bathtub leak can quietly cause extensive damage behind the scenes, compromising your home’s safety and your family’s health. Water has a way of seeping into every crack and crevice, weakening structural materials and creating the perfect environment for mold to thrive.
Ignoring the problem won’t make it go away; it will only make it worse and more expensive. What starts as a slow drip can saturate drywall, rot wooden support beams, and lead to a cascade of problems that affect more than just the area directly below your tub. Professional water damage restoration isn’t just about drying out a wet spot—it’s about addressing the hidden consequences before they spiral out of control. Acting quickly is the single most important thing you can do to protect your property and your wallet. In fact, water damage is one of the most common homeowner insurance claims, and letting a small leak fester is a surefire way to end up with a massive, costly problem that could have been easily prevented.
Risk of Structural Damage and Ceiling Collapse
That persistent drip from your upstairs bathtub is doing more than just staining your ceiling. Over time, the water soaks into the subfloor, drywall, and wooden joists that hold your home together. These materials aren’t designed to be constantly wet, and prolonged exposure causes them to swell, warp, and rot. As the wood weakens, the structural integrity of your floor and ceiling is compromised. A sagging ceiling is a serious red flag that indicates significant damage. If left unaddressed, it could eventually lead to a partial or full collapse, posing a major safety risk. This is when a small leak turns into a need for complete restoration work.
The Threat of Mold and Health Hazards
Where there’s persistent moisture, mold is almost sure to follow. The dark, damp space between your bathroom floor and the ceiling below is an ideal breeding ground for mold spores. Mold can begin to grow in as little as 24 to 48 hours after a leak starts. Not only does mold cause further damage by eating away at organic materials like wood and drywall, but it also poses significant health risks. Exposure to mold can trigger allergic reactions, asthma attacks, and other respiratory problems. Protecting your family’s health is a critical reason to address any leak immediately with professional environmental cleanup if you suspect mold growth.
How Small Leaks Lead to Expensive Repairs
Procrastination is the enemy when you’re dealing with a water leak. A simple issue, like a cracked drain seal that might cost a few dollars to replace, can quickly escalate into a multi-thousand-dollar repair bill. The longer you wait, the more damage the water causes. Soon, you’re not just fixing a leak; you’re replacing drywall, remediating mold, and possibly even repairing structural beams. The cost of repairs grows exponentially the longer the problem is ignored. Responding to emergency water damage right away is the most effective way to minimize the financial impact and get your home back to normal faster.
How to Prevent Future Bathtub Leaks
After dealing with a leak, the last thing you want is a repeat performance. The good news is that proactive care can go a long way in preventing future water damage. By paying attention to your bathroom’s plumbing and structure, you can catch small problems before they become major disasters. Think of it as simple home health care for one of the most-used rooms in your house. Here are a few key strategies to keep your bathtub where it belongs—and the water out of your ceiling.
Perform Regular Maintenance Checks
You don’t have to be a plumbing expert to keep an eye on things. Make it a habit to periodically check the caulk and grout lines around your tub for any cracks or gaps. Look at the ceiling below for discoloration or peeling paint—these are classic red flags. Inside the bathroom, check for musty smells that could signal hidden moisture. Catching a small issue, like failing sealant, is much easier and cheaper than dealing with a full-blown leak. Regular checks are your first line of defense in leak detection and can save you a major headache.
Invest in Quality Materials and Installation
When it comes to plumbing, you often get what you pay for. If you’re remodeling, choosing quality materials for your bathtub, drain assembly, and pipes is a smart investment. Cheaper materials can degrade faster, leading to cracks and failures. Even more important is proper installation. Many leaks are caused by simple installation errors, like seals that aren’t tight enough or misaligned pipes. Hiring a qualified professional ensures every connection is secure. This upfront cost can prevent much more expensive water damage restoration work later on.
Monitor Your Water Pressure
Your home’s water pressure might not be something you think about, but it can have a big impact on your plumbing. Excessively high pressure puts constant strain on pipes, joints, and seals, accelerating wear and tear. This is especially true for older homes with metal pipes that can weaken over time. You can buy a simple water pressure gauge at a hardware store to test it, or ask a plumber to check it for you. If the pressure is too high, a pressure-reducing valve can be installed. This simple device can be the key to preventing burst pipes and other pressure-related leaks.
Need Help Now? Our Emergency Restoration Process
When you’re dealing with a leak, time is not on your side. A small drip can quickly become a major disaster, causing structural damage and creating the perfect environment for mold. That’s why acting fast is so important. At Drywizard, we’ve built our entire process around speed, expertise, and clear communication, so you know exactly what’s happening every step of the way. From the moment you call us, our goal is to get your home back to normal as quickly and safely as possible.
We handle everything from the initial emergency call to the final coat of paint, and we even help you with the insurance paperwork. Here’s a look at what you can expect when you trust our team with your home.
Our 24/7 Rapid Response Team
That sinking feeling you get when you spot a water stain spreading across your ceiling is something we understand completely. A bathtub leaking into the room below is a serious problem that requires an immediate fix. We know these emergencies don’t stick to a 9-to-5 schedule, which is why our team is on call 24/7, 365 days a year. When you contact us, we guarantee an expert will be on-site in 45 minutes or less to stop the damage in its tracks. Our rapid response is the first and most critical step in preventing further harm to your property and giving you immediate peace of mind.
How We Assess and Restore Your Property
Once we arrive, our first step is to find exactly where the leak is coming from. Our IICRC-certified technicians use advanced equipment to pinpoint the source, whether it’s a cracked drain, a faulty pipe, or a failed seal. After stopping the leak, we conduct a thorough assessment of the affected areas. We then begin the water damage restoration process, which includes removing standing water, drying out all affected materials with industrial-grade equipment, and treating the area to prevent mold growth. Our team handles the entire job, from the initial plumbing fix to repairing drywall and restoring your ceiling to its original condition.
We’ll Help With Your Insurance Claim
Dealing with water damage is stressful enough without having to manage an insurance claim on top of it. We’re here to help with that, too. Water damage is a common issue, making up a significant percentage of all homeowner insurance claims. We meticulously document every step of the restoration process with photos and detailed notes that your insurance company will need. Our team has years of experience working with all major insurance providers in Florida, and we can communicate directly with your adjuster to ensure the claims process is as smooth and straightforward as possible. We provide all the documentation your insurer needs for a complete restoration claim.
Related Articles
- Is There A Hidden Water Leak Behind Your Wall?
- Leak Detection in Tampa, FL – Leak Detectors
- Emergency Plumbing in Tampa, FL – Emergency Plumbers
- Burst Pipes in Tampa, FL – Fix Broken Pipes
- Burst Pipes – Drywizard Restoration & Drywall Inc.
Frequently Asked Questions
How can I tell if the leak is from the tub itself or the plumbing pipes? A great way to narrow it down is to pay attention to when the leak happens. If you only see water on the ceiling after you drain the tub, the problem is likely with the drain assembly. If the leak is constant or happens whenever you turn on the faucet, it’s more likely a supply line issue. A crack in the tub itself will usually only leak when there’s standing water in it.
Will my homeowner’s insurance cover the damage from a leaking bathtub? Most standard homeowner’s insurance policies cover damage from sudden and accidental water leaks, like a burst pipe. However, they may not cover damage that results from a slow, long-term leak or poor maintenance. The best first step is to document everything with photos and contact your insurance agent right away to understand your specific coverage.
Is it safe to stay in my home if the ceiling is wet or sagging? You should treat a sagging ceiling as a serious safety hazard. It indicates that the materials are saturated and have lost their structural integrity, creating a risk of collapse. It’s also important to turn off the electricity to that area to avoid electrical shorts. Your safest bet is to clear the room below and call a professional restoration company immediately to assess the situation.
Can I just paint over the water stain on my ceiling once the leak is fixed? Painting over the stain is only a cosmetic fix that traps moisture inside your ceiling. The real problem is the water that has soaked into the drywall, insulation, and wood joists. If not properly dried, this hidden moisture can lead to mold growth and structural rot. A professional restoration service uses specialized equipment to ensure the entire area is completely dry before any cosmetic repairs begin.
How long does the whole restoration process usually take? The timeline really depends on the extent of the damage. For a minor leak that’s caught early, the drying and repair process might only take a few days. If the water has caused significant damage to the subfloor, ceiling, and walls, the restoration will naturally take longer. Once a professional team assesses the situation, they can give you a much clearer timeline for getting your home back to normal.