Water is one of the most destructive forces your home can face, mainly because the worst damage often happens where you can’t see it. A small, discolored patch from water on drywall might seem like a minor cosmetic issue, but it could be a warning sign of a much larger problem lurking within your walls. Moisture can seep from a leaky pipe or a compromised roof, saturating insulation and wooden studs long before you notice anything is wrong. This creates a hidden breeding ground for mold. We’ll show you how to investigate the problem, what immediate actions to take, and how to spot the subtle signs of hidden damage before it compromises your home’s structure and air quality.
Key Takeaways
- Act Fast to Minimize Damage: Your first steps after discovering wet drywall are the most important. Immediately stop the water source, remove any standing water, and use fans to create airflow, which is your best defense against further damage and mold.
- Determine if the Drywall is Salvageable: Before attempting a repair, check the wall’s integrity. If it feels soft, looks warped or saggy, or has a musty odor, the material is too compromised and must be replaced to prevent structural issues and mold.
- Recognize When to Call for Help: While a minor, dry water stain can be a DIY fix, you should call a professional for larger issues. Widespread damage, signs of mold, contaminated water, or moisture trapped behind walls requires expert handling to ensure your home is properly and safely restored.
What Causes Wet Drywall?
Discovering a damp, discolored spot on your drywall is a frustrating moment for any property owner. The cause isn’t always as obvious as a major flood; sometimes, the source is slow-moving and hidden from view. Water has a knack for finding its way into places it shouldn’t be, and drywall acts like a sponge, soaking it up and creating the perfect environment for bigger problems like structural damage and mold. Understanding where the water is coming from is the first critical step in fixing the problem for good. From sudden pipe bursts to the slow creep of humidity, let’s walk through the most common culprits behind wet drywall.
Burst pipes and hidden leaks
One of the most frequent causes of water-damaged drywall is a plumbing issue. This can be a dramatic event, like a burst pipe that floods a room in minutes, or something much sneakier, like a tiny, persistent drip from a fitting inside a wall. These hidden leaks are particularly troublesome because they can go unnoticed for weeks or months, slowly saturating the drywall, wood studs, and insulation. By the time you see a stain or feel a soft spot, the damage behind the wall could be extensive. Regular plumbing checks and professional leak detection can help you catch these issues before they spiral out of control.
Roof damage from storms
Here in Florida, our homes are constantly tested by heavy rain and strong winds. A compromised roof is a direct line for water to enter your home. A few missing shingles, damaged flashing around a chimney, or clogged gutters can allow rainwater to seep into your attic and travel down through the ceiling and walls. This type of water intrusion poses a serious threat to drywall, leading to ugly stains, weakening of the material, and eventually, mold growth. After a major storm, it’s always a good idea to inspect your roof and attic for any signs of leaks to prevent the need for long-term water damage restoration.
Appliance malfunctions and overflows
The modern conveniences in our homes can sometimes turn against us. A malfunctioning washing machine, a leaking dishwasher, or an overflowing toilet can release a significant amount of water in a short time. Even the supply line to your refrigerator’s ice maker can spring a leak and go unnoticed behind the unit. When these appliances fail, the water often soaks into the drywall of your kitchen, bathroom, or laundry room. Another common source is failing hot water tanks, which can leak or burst, causing major damage to the surrounding area. Acting fast in these situations is key to minimizing the impact.
High humidity and condensation
Sometimes, the enemy is in the air itself. In a humid climate like ours, poor ventilation can lead to high moisture levels inside your home, especially in bathrooms, kitchens, and basements. When this warm, moist air hits a cooler surface like an exterior wall, condensation forms. Over time, this constant dampness can be absorbed by the drywall, causing it to become soft and discolored. While it might not seem as urgent as a burst pipe, chronic condensation creates an ideal breeding ground for mold and mildew, which can lead to poor indoor air quality and require professional environmental cleanup.
Flooding or sewer backups
On the more severe end of the spectrum are flooding and sewer backups. Major flooding from a hurricane or intense rainstorm can submerge the lower portions of your walls, causing widespread and devastating damage. Even more hazardous are sewer backups, which introduce highly contaminated “black water” into your property. This water contains bacteria, viruses, and other dangerous pathogens that pose a serious health risk. Any drywall that comes into contact with floodwater or sewage is unsalvageable and must be removed and replaced by certified professionals to ensure your home is safe and sanitary.
Found Wet Drywall? Take These Steps Immediately
Finding a damp, squishy spot on your wall can be alarming, but don’t panic. Acting quickly is the key to minimizing damage and preventing bigger problems like mold and structural issues. The moments right after you discover wet drywall are critical. By following a few immediate steps, you can get the situation under control before it gets worse. Here’s exactly what you need to do to protect your property and start the recovery process.
Stop the water at its source
First things first: you need to stop more water from coming in. If you’re dealing with a plumbing issue like a burst pipe, find your home’s main water shut-off valve and turn it off. It’s usually located in a basement, crawl space, or garage. If the water is coming from a leaky roof or window during a storm, do what you can to temporarily patch the area or place buckets to catch the drips. Your safety is the top priority, so be extremely cautious around any electrical outlets or appliances near the water. If you can’t safely find or stop the source, call for emergency plumbing help right away.
Remove any standing water
With the source of the water shut off, your next job is to get rid of any standing water on the floor. Grab some old towels, a mop and bucket, or a wet/dry vacuum to soak up as much of the liquid as you can. The faster you remove the excess water, the less chance it has to seep deeper into your subflooring, baseboards, and the bottom of your drywall. This initial cleanup is a crucial first response that can save you from more extensive and costly water damage restoration down the line. It’s a bit of manual labor, but it makes a huge difference.
Create airflow with fans and dehumidifiers
Now it’s time to start the drying process. Open up windows if the weather permits, and set up any fans you have—box fans, oscillating fans, ceiling fans—to get the air moving across the wet surfaces. This helps encourage evaporation. If you own a dehumidifier, place it in the affected room and let it run continuously. This powerful tool will pull moisture directly out of the air and the damp drywall, which is essential for preventing mold growth. Proper drying is more than just surface-level; you need to address the moisture trapped within the wall cavity to avoid long-term issues.
Document the damage for your insurance claim
Before you move anything or start tearing out damaged materials, pause and pull out your phone. Take clear photos and videos of everything. Document the wet drywall, the source of the leak if you found it, any puddles on the floor, and any personal belongings that were damaged. Make notes about when you discovered the problem and the steps you’ve taken so far. This evidence is incredibly important for your homeowner’s insurance claim. Detailed documentation will make the claims process much smoother and helps ensure you get the coverage you need for a complete restoration.
Check surrounding areas for hidden moisture
Water is sneaky and can travel in unexpected ways. The damp spot you see on the wall might not be the only problem area. Gently press on the drywall in the surrounding areas to check for other soft spots. Look for discoloration along baseboards or peeling paint on adjacent walls. Moisture can easily seep into insulation, flooring, and wall studs without being immediately visible. Using a professional leak detection service can uncover hidden moisture pockets that would otherwise lead to mold and rot. A thorough check ensures you’re addressing the full scope of the problem from the start.
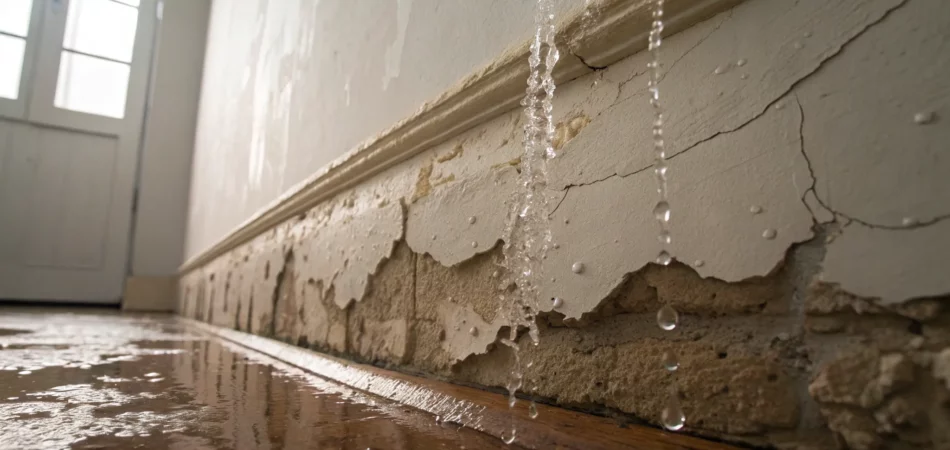
Is the Drywall Salvageable? How to Tell
After you’ve stopped a leak or cleaned up a spill, the next big question is what to do about the soggy drywall. Can you save it, or does it need to be replaced? The answer really depends on a few key factors: how much water was involved, how long the drywall was wet, and whether the water was clean or contaminated. A small, quickly-dried spot from a clean source might be fine, but extensive saturation or lingering moisture is a recipe for trouble. Before you decide to patch it up, you need to play detective and assess the situation carefully. Knowing what to look for will help you make the right call and avoid bigger problems—like structural issues or mold—down the road.
Spotting signs of structural damage
The first thing to check is the drywall’s physical condition. Water is the natural enemy of drywall; its gypsum core and paper facing lose all their strength when saturated. Start with a visual inspection. Look for obvious water stains, which often appear as yellowish or brownish discolorations that may have distinct outlines. You should also check for peeling paint or wallpaper that is bubbling or pulling away from the wall. These are clear signs that moisture has seeped in and broken the bond between the surface layer and the drywall itself. If you see any warping or bowing, it means the panel has absorbed a significant amount of water and is losing its shape, which is a serious sign of compromised integrity. A professional water damage restoration service can assess the full extent of the damage.
Checking for soft spots or sagging
Next, it’s time for a hands-on check, but be gentle. Carefully press on the damp or stained areas of the drywall. If it feels soft, spongy, or mushy under your fingers, it’s a goner. That softness means the gypsum core has broken down and can no longer provide structural support. In more severe cases, you might see the drywall sagging or bulging. This is especially common on ceilings, where the weight of trapped water pulls the panel downward. Sagging is a major red flag indicating that the drywall has lost its structural integrity completely and could collapse. If you notice any of these signs, replacement isn’t just recommended—it’s necessary for safety. This kind of situation often requires an emergency water damage response to prevent further issues.
Identifying mold growth and musty odors
Where there’s moisture, there’s often mold. Even if the drywall feels like it’s starting to dry, you need to look and smell for signs of microbial growth. Visually, mold can appear as black, green, or even white fuzzy spots or specks on the surface of the wall. Sometimes it hides behind peeling paint or wallpaper. Don’t rely on your eyes alone, though. Your nose is one of your best tools here. A persistent, musty, or earthy smell is a classic sign of hidden mold growing on the back of the drywall or within the wall cavity. Since mold can cause health issues and spread quickly, any sign of it means the affected materials should be removed by professionals who specialize in environmental cleanup.
Understanding the 48-hour mold window
Time is not on your side when it comes to wet drywall. Mold can begin to grow in as little as 24 to 48 hours after moisture is introduced. This is a critical window. If you can get the drywall completely dry within this timeframe, you have a decent chance of saving it, provided it wasn’t saturated. However, if the drywall has been wet for longer than 48 hours, you should assume that mold growth has already started, even if you can’t see or smell it yet. At that point, the risk is simply too high, and the safest course of action is to cut out and replace the affected sections. Acting fast is everything, so don’t hesitate to contact us for a rapid response.
Common myths about repairing wet drywall
Many people hope for a quick fix, but some common beliefs about wet drywall are just plain wrong. One major myth is that you can simply paint over a water stain with a stain-blocking primer. While this covers the discoloration, it does nothing to address the moisture trapped inside the wall, which can lead to rot and hidden mold. Another misconception is that if the surface feels dry, everything is fine. Drywall can feel dry to the touch while still holding moisture deep within its core. It’s also crucial to consider the water source. Drywall soaked by a clean supply line is one thing, but material contaminated by a sewer backup must be removed immediately due to dangerous bacteria. Don’t take chances; a complete restoration ensures the problem is solved correctly.
Fixing Minor Drywall Damage: A DIY Guide
If you’ve caught a small leak early, you might be able to tackle the drywall repair yourself. This guide is for minor cosmetic issues—think a small water stain on the ceiling from a brief overflow or a damp spot on the wall from a leaky window that’s now been fixed. For anything more serious, like damage from burst pipes, widespread moisture, or sagging walls, your best bet is to call in the professionals. Trying to fix major water damage on your own can lead to bigger problems like hidden mold and structural issues.
When you’re confident the damage is minor and the source of the water has been stopped, you can get to work. Following the right steps is key to making sure the repair lasts and the damage doesn’t come back. We’ll walk through how to properly dry, patch, and paint the affected area to get your wall looking as good as new.
Gather your tools and materials
Before you start, it’s helpful to have everything you need in one place. This will make the process go much smoother. You’ll want to grab some drop cloths to protect your floors, a putty knife, fine-grit sandpaper, a drywall patch kit or joint compound for any small holes, and a moisture meter. For the finishing touches, you’ll need a quality stain-blocking primer, your matching wall paint, and brushes or rollers.
Having the right tools makes all the difference. While this list covers the basics for a small patch job, remember that every situation is unique. If you cut into the wall and find that the insulation is soaked or the damage is much larger than you thought, it’s time to pause the DIY project. It’s always better to get a professional opinion than to risk incomplete repairs.
Dry the affected area completely
You absolutely cannot skip this step. Painting over damp drywall is a recipe for disaster, as it traps moisture inside the wall and creates a perfect environment for mold to grow. The first thing you need to do is get the area as dry as possible. Start by blotting the surface with old towels to soak up any excess water.
Next, get the air moving. Open windows if you can, and set up fans pointing directly at the wet spot. If you have a dehumidifier, place it in the room to help pull moisture out of the air and the wall itself. Be patient here—it can take at least 72 hours for drywall to dry out completely. Rushing this part will only cause problems down the road, so give it the time it needs. Proper water damage restoration always starts with thorough drying.
Use a moisture meter to confirm it’s dry
Your hands can be deceiving. A wall might feel dry to the touch, but there could still be moisture trapped deep inside the drywall. The most reliable way to check for dampness is with a moisture meter. These devices give you a precise reading, so you know for sure when it’s safe to move on to the repair stage. You can find them at most home improvement stores.
If you don’t have a moisture meter, you can try a more low-tech method. Carefully remove a piece of the baseboard near the affected area and gently press the tip of a screwdriver into the drywall. If the drywall is soft, spongy, or crumbles easily, it’s still wet. Don’t proceed with any repairs until you get a firm, solid response from the drywall.
Patch, sand, and smooth the surface
Once you’ve confirmed the drywall is completely dry, you can assess the surface damage. If you just have a water stain with no bubbling, peeling, or softness, you’re in luck—you can likely skip straight to priming and painting. However, if the texture has been compromised, you’ll need to do some patching.
For small holes or areas where the paper has peeled, use a putty knife to apply a thin layer of joint compound or spackle. Smooth it out as best you can and let it dry completely. Then, lightly sand the area until it’s flush with the rest of the wall. You might need to repeat this process with a second layer to get a perfectly smooth finish. The goal is to create a seamless surface that will be invisible once painted.
Apply primer and a fresh coat of paint
Don’t be tempted to paint directly over the water stain, even if it seems faint. Water stains have a nasty habit of bleeding through latex paint, and you’ll see it reappear within a few weeks. To prevent this, you must use a stain-blocking primer. Apply a coat of primer over the entire patched area, extending a little onto the surrounding wall.
After the primer is dry, you can finally apply your paint. For the best results, you may need to paint the entire wall from corner to corner to ensure the color and sheen match perfectly. Otherwise, your patch might be noticeable in certain lighting. Taking this extra step will give you a professional-looking finish. And if you ever face a project that’s too big to handle, remember that a complete restoration service can handle everything from start to finish.
When It’s Time to Call a Professional
While tackling home repairs yourself can be rewarding, water damage is one area where a DIY approach can backfire. What seems like a small, manageable issue on the surface can hide much bigger problems within your walls, floors, and ceilings. Letting water damage sit or failing to address it completely can lead to structural issues, persistent mold growth, and more expensive repairs down the road. Knowing when to put down the tools and pick up the phone is key to protecting your property and your peace of mind. If you find yourself in any of the following situations, it’s a clear sign you need professional help.
The damage is too extensive for a DIY fix
A small leak under the sink is one thing, but when water has spread to multiple rooms, soaked through the ceiling, or saturated an entire wall, the scope of the job is beyond a weekend project. Extensive damage requires a coordinated strategy for water extraction, demolition of unsalvageable materials, and structural drying. A professional water damage restoration team arrives with industrial-grade air movers, dehumidifiers, and the expertise to manage a large-scale project efficiently. They can quickly assess the full extent of the damage and create a plan to get your home back to normal much faster than you could on your own.
You see or smell mold
If you notice a musty, earthy odor or see visible spots of black, green, or white growth, stop what you’re doing. Mold can begin to form within 24 to 48 hours of water exposure and poses a significant health risk. Trying to scrub it away with household cleaners can actually release spores into the air, spreading the problem to other areas of your home. Professionals are trained in safe mold remediation and environmental cleanup. They use proper containment methods and specialized equipment to remove the mold completely and address the underlying moisture issue that allowed it to grow in the first place.
Moisture is trapped behind walls or insulation
Water is incredibly deceptive. It can wick up drywall, seep behind baseboards, and saturate insulation, all while leaving very few signs on the surface. That small discolored spot on your wall could be the tip of the iceberg. Professionals don’t guess; they use advanced tools like moisture meters and thermal imaging cameras for accurate leak detection behind walls and under floors. Identifying and drying these hidden pockets of moisture is absolutely critical. If left unaddressed, trapped water will slowly rot your home’s structure and create a breeding ground for mold, leading to much more serious problems later on.
You need help with your insurance claim
After the initial shock of discovering water damage, the next thought is often about insurance. Navigating the claims process can be confusing and overwhelming. A reputable restoration company can be your greatest ally. They are experienced in working with insurance providers and know exactly what documentation is required, from detailed reports and moisture readings to photos and precise estimates. This professional documentation strengthens your claim and helps ensure you receive fair compensation for a complete restoration. They can handle communication with your adjuster, taking a major source of stress off your shoulders.
You have an ongoing water emergency
When a pipe bursts or a sewer line backs up, water is actively flooding your home. This is a crisis that requires immediate action. Every minute that passes means more damage to your property. Instead of scrambling to figure out how to stop the flow, your first call should be to an emergency response team. A 24/7 service specializing in emergency water damage can be on-site in under an hour to stop the source of the leak, begin extracting water, and deploy drying equipment. Their rapid response is crucial for minimizing the overall destruction and preventing secondary issues like mold.
Related Articles
- A Step-by-Step Guide to Repair Drywall Water Damage – Drywizard Restoration & Drywall Inc.
- How to Choose a Water Damage Restoration Company – Drywizard Restoration & Drywall Inc.
- Factors Affecting Mold Growth Following Water Damage – Drywizard Restoration & Drywall Inc.
- The Emergency Water Removal Process: 4 Key Steps – Drywizard Restoration & Drywall Inc.
Frequently Asked Questions
How long does it really take for drywall to dry out? This is a great question because the answer is almost always “longer than you think.” While a small, lightly dampened area might dry in about three days with good airflow from fans and a dehumidifier, it really depends on the humidity in your home and how saturated the wall became. The surface might feel dry to the touch in a day, but moisture can remain trapped inside the gypsum core. The safest way to know for sure is to use a moisture meter, which gives you a definitive reading and ensures you aren’t sealing in a future mold problem.
My wall feels dry, but there’s a musty smell. What should I do? That musty, earthy smell is a major red flag that shouldn’t be ignored. It’s the classic sign of hidden mold growing where you can’t see it—likely on the back of the drywall, in the insulation, or on the wood studs inside the wall cavity. Even if the wall feels dry, moisture is clearly trapped somewhere. Your best move is to call for a professional inspection. They have tools that can pinpoint hidden moisture and can safely check for mold without spreading spores through your home.
Can I just use a stain-blocking primer on a small water spot? It’s tempting to look for a quick fix, but painting over a water stain is one of the worst things you can do. While a good primer will cover the discoloration, it does absolutely nothing to address the moisture that caused the stain in the first place. You’re essentially trapping that dampness inside the wall, which can lead to wood rot, structural decay, and hidden mold growth. You have to solve the moisture problem first and make sure the drywall is completely dry before even thinking about paint.
Will my homeowner’s insurance cover the cost of fixing wet drywall? Generally, homeowner’s insurance policies cover damage that is sudden and accidental, like a burst pipe or a washing machine overflow. However, they are less likely to cover damage from gradual issues, such as a slow leak that went unrepaired, or problems caused by a lack of maintenance. The best first step is to document everything with photos and call your insurance agent to understand your specific policy. Working with a professional restoration company can also be a huge help, as they know how to provide the detailed documentation your insurer will need.
What’s the difference between damage from a clean water leak versus a sewer backup? This is a critical distinction that determines the entire approach to cleanup. Damage from a “clean water” source, like a supply line, is a problem but doesn’t pose an immediate health threat. On the other hand, water from a sewer backup is considered “black water” and is highly contaminated with dangerous bacteria and pathogens. Any porous material it touches, including drywall, carpet, and insulation, is considered a biohazard and must be removed and disposed of by certified professionals to make your home safe again.